Alle indlæg af urtehave_com

KONDITION

step2

Training ladder for:
CHRONIC COMPARTMENT SYNDROME IN THE FOREARM
(CHRONIC KOMPARTMENTSYNDROM)

STEP 2

KONDITION
Unlimited: Cycling. Swimming. Running.

UDSPÆNDING
(20 min)

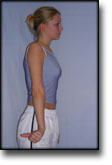
Stand with outstretched arm by your side with fist lightly clenched. Rotate your arm so that the thumb is drawn inwards and backwards as far as possible. Bend your wrist as far as it can go, so that the back of the hand faces downwards. Hold the position for 20 seconds and relax for 20 seconds before repeating.

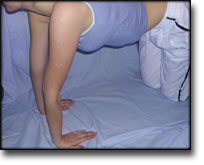
Go down on all fours with your fingers and elbow facing towards the knees. Your arms should be outstretched. Move your body backwards so that increased stretching is felt in the forearm. Hold the position for 20 seconds and relax for 20 seconds before repeating.

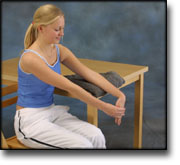
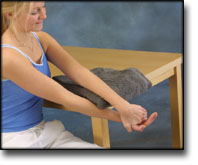
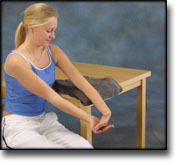
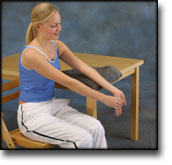
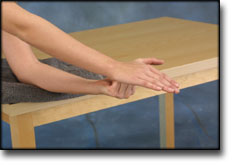
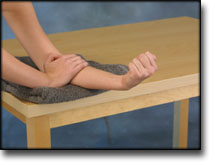
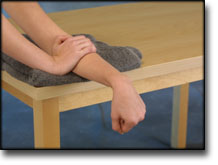
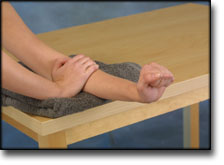
Sit at a table with the injured arm hanging over the edge with the palm facing downwards. Use the other arm to apply pressure on the back of the injured hand so that the injured lower arm becomes increasingly stretched on the upper side. Repeat the exercise where the injured hand is alternately pressed from side to side. The injured arm should finally be turned over and the exercise repeated by pressing the underside of the hand so that the injured lower arm becomes increasingly stretched on the under side. The stretching positions should be held for 20 seconds followed by 20 seconds of rest before repeating.

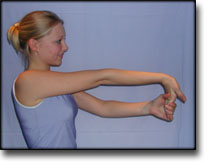
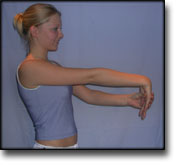
Bend your wrist up as far as possible and press with the opposite hand. Hold the position for 20 seconds. Repeat the exercise pressing the wrist downwards. Hold the position for 20 seconds.

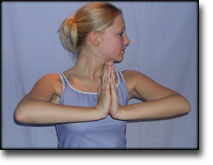
Press your hands together and lift your elbows while holding your arms in front of your chest. Hold the position for 20 seconds and relax for 20 seconds before repeating.

STYRKE
(40 min)

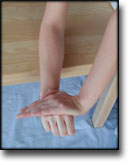
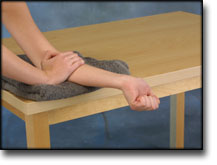
Sit at a table with the injured hand over the edge and the palm facing upwards. Use the good hand to place slight pressure on the injured hand and hold the position for 10 seconds. Rest for 10 seconds before repeating.

Sit at a table with your hand over the edge and the palm facing downwards. Using the good hand apply slight pressure to the injured hand and hold the position for 10 seconds. Relax for 10 seconds before repeating.

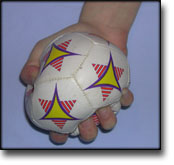
Squeeze a soft ball.

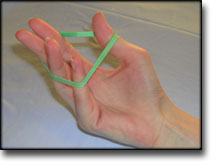
Put an elastic band around your fingers. Spread your fingers so that the elastic is stretched.

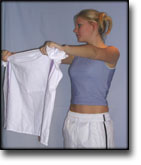
Curl a tea towel with outstretched arms.

Stretching is carried out in the following way: stretch the muscle group for 3-5 seconds. Relax for 3-5 seconds. The muscle group should subsequently be stretched for 20 seconds. The muscle is allowed to be tender, but must not hurt. Relax for 20 seconds, after which the procedure can be repeated. The time consumed for stretching, coordination and strength training can be altered depending on the training opportunities available and individual requirements.

KONDITION

step1

Training ladder for:
CHRONIC COMPARTMENT SYNDROME IN THE FOREARM
(CHRONIC KOMPARTMENTSYNDROM)

STEP 1

The indications of time after stretching, coordination training and strength training show the division of time for the respective type of training when training for a period of one hour. The time indications are therefore not a definition of the daily training needs, as the daily training is determined on an individual basis.

KONDITION
Unlimited: Cycling. Running.

UDSPÆNDING
(20 min)

Stand with outstretched arm by your side with fist lightly clenched. Rotate your arm so that the thumb is drawn inwards and backwards as far as possible. Bend your wrist as far as it can go, so that the back of the hand faces downwards. Hold the position for 20 seconds and relax for 20 seconds before repeating.

Go down on all fours with your fingers and elbow facing towards the knees. Your arms should be outstretched. Move your body backwards so that increased stretching is felt in the forearm. Hold the position for 20 seconds and relax for 20 seconds before repeating.

Sit at a table with the injured arm hanging over the edge with the palm facing downwards. Use the other arm to apply pressure on the back of the injured hand so that the injured lower arm becomes increasingly stretched on the upper side. Repeat the exercise where the injured hand is alternately pressed from side to side. The injured arm should finally be turned over and the exercise repeated by pressing the underside of the hand so that the injured lower arm becomes increasingly stretched on the under side. The stretching positions should be held for 20 seconds followed by 20 seconds of rest before repeating.

Bend your wrist up as far as possible and press with the opposite hand. Hold the position for 20 seconds. Repeat the exercise pressing the wrist downwards. Hold the position for 20 seconds.

Press your hands together and lift your elbows while holding your arms in front of your chest. Hold the position for 20 seconds and relax for 20 seconds before repeating.

STYRKE
(40 min)

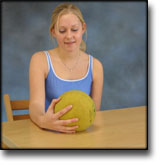
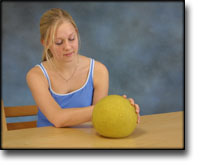
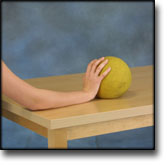
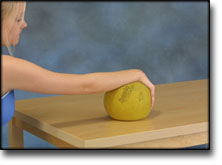
Sit at a table with the injured hand on a ball and roll slowly from side to side.

Sit at a table with the injured hand over the edge with the palm facing upwards. Bend and stretch the wrist.

Sit at a table with the injured hand over the edge with the palm facing downwards. Bend and stretch the wrist.

Sit at a table with the injured hand on a ball and roll slowly backwards and forwards.

Sit at a table with your hand over the edge and the palm facing downwards. Using the good hand apply slight pressure to the injured hand and hold the position for 10 seconds. Relax for 10 seconds before repeating.

Stretching is carried out in the following way: stretch the muscle group for 3-5 seconds. Relax for 3-5 seconds. The muscle group should subsequently be stretched for 20 seconds. The muscle is allowed to be tender, but must not hurt. Relax for 20 seconds, after which the procedure can be repeated. The time consumed for stretching, coordination and strength training can be altered depending on the training opportunities available and individual requirements.

treatment-article

SportNetDoc

Common compartment syndromes in athletes. Treatment and rehabilitation.

Hutchinson MR, Ireland ML. Sports Med 1994 Mar;17(3):200-8.

Compartment syndromes in athletes are rare, but they can also be limb-threatening events. Chronic exertional compartment syndrome (CECS) is a less emergent form where symptoms recur with repetitive loading or exertional activities. CECS is the most common form of compartment syndrome seen in athletes. Acute compartment syndromes may also occur in athletes secondary to direct trauma or may develop from pre-existing CECS. The leg is by far the most common site of compartment syndrome in athletes. The thigh, forearm, and foot are the next most common sites, although any fascially limited compartment can be affected. Awareness of the clinical presentation and pathophysiology of compartment syndromes can help the examiner make a prompt and accurate diagnosis. The treatment of acute compartment syndrome is emergent while the treatment of CECS is not. Conservative treatment and rehabilitation can be successful in treating CECS. Acute compartment syndromes must be treated immediately with surgical decompression. With CECS, if conservative treatment fails, surgical decompression is also indicated. Some authors have suggested that the results of surgical fasciotomy and rate of return to sport for athletes with CECS has not been uniform. If the diagnosis is accurate and carefully documented, a high degree of success with athletes returning to sport can be expected.

cause-article

SportNetDoc

Cubital bursitis.

Karanjia ND, Stiles PJ. J Bone Joint Surg Br 1988 Nov;70(5):832-3.

We describe two cases of bursitis at the insertion of the biceps tendon. They presented as swellings in the cubital fossa with symptoms of median nerve irritation. The aetiology was probably mechanical trauma; both patients were cured by operation.

treatment-article

SportNetDoc

Placement of intra-articular injections verified by ultrasonography and injected air as contrast medium.

Fredberg U, van Overeem Hansen G, Bolvig L. Ann Rheum Dis 2001 May;60(5):542.

Intraarticular injection of long-acting corticosteroid is a corner stone in rheumatological treatment. The injected intra-articular corticoid is more effective when the placement is correctly secured. Injection of radiographic contrast material has shown that less than half of the injections are correct placed in the joint space after blind injection. Generally, the clinical application of ultrasonographic examinations can be enhanced by contrast agents. The most common used technique is creation of microbubble contrast agents. Such agents, applied to the bloodstream, have been used for hepatic, nephrologic, cardiologic and transcranial examinations. Obviously, the risk of air embolism depends on the anatomic site of the injected air contrast. Transient ischemic attacks are described after echocardiography with air contrast and in animal models haemodynamic effects during venous air infusion can be measured. Intra-articular injection of air and subsequently lateral and posterior radiographs has shown that this technique can enhance the procedure precision. The disadvantage of this method is that the result can first be seen after the injection, and that a correction can only be made with a new injection. In the joint space the air is separated from the vascular system and when only small amounts of sterile air are used the risk of venous air embolism is neglectable. Air is a very effective contrast medium in ultrasonography. Air sonography has been used for the diagnosis of meniscus lesions in knee joints and for rotator cuff lesions in the shoulder. We expand the applicability of this method to all joints, not only for diagnostic purposes, but also for the correct placement of the needle before injection of medicine (steroid, osmium-acid, viscosupplementation): The sterile air that is contained in the capped vial with lidocain or steroid is used as contrast medium. The needle is ultrasonographic guided placed in the joint space profound for the distended capsule. When the steroid and lidocain are mixed in the syringe a small volume of air will be in the needle itself (˜ 0.05 ml). The air in the needle is clearly seen when the injection is started and will secure the correct placement of the needle. With this technique, it is not necessary to use two separate syringes and the inclination of the syringe will not cause the air to move from the needle to the bottom of the syringe. If the knee is injected, injection directly into the recess is recommended, which will make the small volume of air possible to be seen momentary. Figure 1 illustrates the ultrasonography of a MTP joint in a patient before (UL-34A) and after (UL-34B) injected air. The intraarticular air is clearly seen. We had made more than one thousand ultrasonography guided intraarticular injection without any complications. This method is easy, inexpensive, without risk and radiation and should be used routinely in rheumatology. Especially chemical synovectomy of the knee should always be guided by ultrasonography and with this technique also smaller joins can be considered for chemical synovectomy.

treatment-article

SportNetDoc

“Dem bones”: osteochondral injuries of the knee.

Hinshaw MH, Tuite MJ, De Smet AA. Magn Reson Imaging Clin N Am 2000 May;8(2):335-48.

MR imaging plays a valuable role in the diagnosis and staging of osteochondral injuries of the femorotibial joint. Bone contusions may be the source of a patient’s pain, and MR imaging characteristics of certain types may help to predict which contusions might progress to more serious osteochondral lesions. MR imaging also is vital in the diagnosis of occult osteochondral fractures and in accurately classifying displaced intra-articular fractures. Although osteochondral dissecans usually is diagnosed radiographically, MR imaging is the best noninvasive test for determining if an osteochondral fragment is unstable. Unstable lesions are a treatable cause of knee pain.

complication-article2

SportNetDoc

Results of reconstruction of acute ruptures of the anterior cruciate ligament with an iliotibial band autograft.

Bak K, Jorgensen U, Ekstrand J, Scavenius M. Knee Surg Sports Traumatol Arthrosc 1999;7(2):111-7.

Forty patients with an acute complete tear of the anterior cruciate ligament (ACL) underwent primary reconstruction with an iliotibial band autograft after median 15 (range 0-90) days. Objective and functional evaluation was performed after median 37 (range 24-87) months by two independent observers using the International Knee Documentation Committee (IKDC) knee evaluation form, the Lysholm knee function score, and the Tegner activity score. During the observation period 5 patients sustained an ACL tear in the contralateral knee, and 1 patient (2.5%) sustained a graft rupture and underwent re-reconstruction. For the remaining 34 knees the Lysholm score at follow-up was median 100 (range 84-100, mean 97 [+/- 4]), all patients scoring excellent (n = 28) or good (n = 6). Three patients (9%) had more than 3 mm side-to-side difference in anteroposterior laxity. All 4 ligament failures occurred in patients operated on within the first 2 weeks after the injury. Twenty-six patients (76%) returned to the same level of activity as prior to the injury. Of 8 who dropped to a lower activity level, only one ascribed this to problems with the operated knee, meaning that 26 of 27 (96%) returned to their desired level of activity. According to the overall IKDC evaluation, 14 patients (40%) had a normal knee (A), 13 (37%) had a nearly normal knee (B), 5 (14%) had an abnormal knee (C), and 2 (9%) had a severely abnormal knee (D). Ten patients (25%) had the staples removed due to local irritation, and further 6 (15%) had local symptoms from the tibial staples. The harvest site gave 8 (20%) patients cosmetic complaints, but all graded this as slight, and 3 (8%) had slight pain during activity from the lateral muscular hernia. In selected individuals performing vigorous knee activities, autologous reconstruction of acute ACL disrupted knees with a combined internal and external iliotibial band transfer demonstrates excellent results after median 3 years. The failure rate is comparable to other techniques.

treatment-article

SportNetDoc

Revision ACL reconstruction using autogenous patellar tendon graft.

Eberhardt C, Kurth AH, Hailer N, Jager A. Knee Surg Sports Traumatol Arthrosc 2000;8(5):290-5.

This retrospective study examined revision anterior cruciate ligament reconstruction using a bone-tendon-bone autograft of the patellar ligament. We followed up 44 patients (mean age 27.9 years) for an average of 41.2 months. Clinical examination with the Lachmann and pivot shift tests showed clearly improved stability; KT-1000 arthrometer measurements had a mean difference of 3.5 mm in side-to-side comparison. The evaluated knee scores were significantly improved (P<0.01); the median Lysholm score was 85 and the median Tegner activity score 5.0 at follow-up. In the IKDC ranking system 75.0% of knees were rated normal or nearly normal (grades A and B). According to a modified Fairbank scale, progression of radiographic signs of osteoarthritis was noted in 36.4%. There was a significant difference (P<0.05) in progression of radiographic signs of osteoarthritis between patients with major (grades III, IV) versus minor (grades I, II) lesions of the articular cartilage surface and between knees with versus without extensive synovitis due to previous synthetic graft reconstruction (P<0.05). Revision anterior cruciate ligament reconstruction using an autogenous patellar tendon graft shows good results with improved knee function compared to the prerevision status and is in line with various operative techniques described in the literature. Progression of osteoarthritis must be expected in patients with major lesions of the articular cartilage surface and knees with long-term extensive synovitis due to previous anterior cruciate ligament reconstruction using synthetic grafts.

KONDITION

week15+

Training ladder for:
RUPTURE OF THE ANTERIOR CRUCIATE LIGAMENT
(RUPTURA LIGAMENTUM CRUCIATUM ANTERIUS)

Uge 15 +

The following exercises can only be considered as a supplement to the guidelines furnished by the doctor which performed the operation. Specific precautions are necessary as the operation can be complicated. The training must not bring about swelling or pain in the knee.
KONDITION
Unlimited: Cycling. Swimming. Running.

UDSPÆNDING
(10 min):

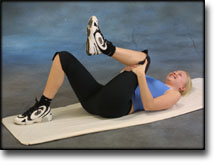
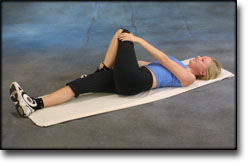
Lie on your back. Draw the injured leg up towards your head so that the muscles in the back of the thigh become increasingly stretched. Perform the exercise with outstretched as well as bent knee. Hold the position for 20 seconds and relax for 20 seconds before repeating. The exercise can also be performed standing with the injured leg outstretched on a chair while the upper body is bent slightly forwards.

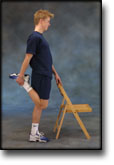
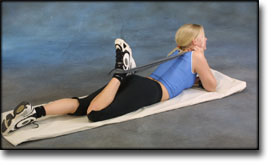
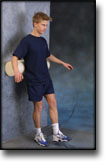
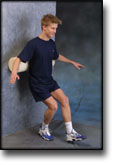
Stand with support from the back of a chair or the wall. Using your hand, bend the knee and draw the foot up and your knee slightly backwards so that the muscles in the front of the thigh become increasingly stretched. Hold the position for 20 seconds and relax for 20 seconds before repeating. The exercise can also be done lying down. If you lie on your stomach you can draw the foot up by using a towel.

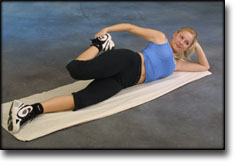
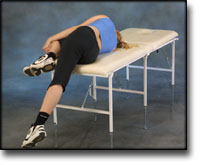
Lie on your side on a table. Bend one leg up under your body and let the other hang over the edge of the table so that the muscles in the outer side of the thigh become increasingly stretched. Hold the position for 20 seconds and relax for 20 seconds before repeating. The exercise can also be done standing by placing the outstretched injured leg behind the good leg at the same time as bending over the injured leg.

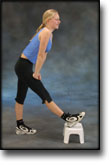
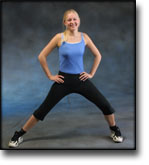
Stand with one leg outstretched and the other slightly bent. Thrust your weight to the side over the bent leg so that the inner side of the opposite thigh becomes increasingly stretched. Hold the position for 20 seconds and relax for 20 seconds before repeating.

Lie on your back with one leg outstretched and the other bent with the foot on the other side of the outstretched leg. Draw the knee up towards the opposite shoulder so that the buttocks become increasingly stretched. Hold the position for 20 seconds and relax for 20 seconds before repeating.

KOORDINATION
(10 min):

Seesaw. Balance on two legs, possibly using a hand as support against the wall, balancing subsequently on one leg without support. Look straight ahead and keep knees bent.

Stand on the healthy leg with elastic fixed around the hip. The elastic should be fixed to the wall or a wall bar. Take-off on the healthy leg and land on the leg to be trained and keep your balance. Remember that the elastic should be positioned so that it gives resistance at the moment of take-off. Change legs.

STYRKE
(40 min):

Up and down from the stool with load. Tie elastic around the hip and go up on the stool in a slow movement. The elastic should be fastened to the wall.

Stand with elastic around the hip. Step forward over one knee and hold the front foot firmly against the floor. Bend the rear leg and go forward onto your toes. Remember to change leg.

Lie on your back with a ball or firm round cushion under both feet. Roll the ball backwards and forwards in a steady pace while lifting your backside.

Lie on your back with a ball or firm round cushion under the injured leg. Lift your backside up from the floor and stretch the healthy leg. Hold the position for a few seconds.

Stand with your back against a wall with a ball or firm round cushion between the wall and your back. Slowly go down to bend your knee 90 degrees before slowly rising up again.

Stand on the healthy leg with the elastic around the inside of the injured leg. Move the injured leg from side to side in a slow smooth movement. Moving the position of the elastic lower down the leg can increase the load.

Stand on the healthy leg with the elastic around the outside of the injured leg. Move the injured leg from side to side in a slow smooth movement. Moving the position of the elastic lower down the leg can increase the load.

Stretching is carried out in the following way: stretch the muscle group for 3-5 seconds. Relax for 3-5 seconds. The muscle group should subsequently be stretched for 20 seconds. The muscle is allowed to be tender, but must not hurt. Relax for 20 seconds, after which the procedure can be repeated. The time consumed for stretching, coordination and strength training can be altered depending on the training opportunities available and individual requirements.