Kategoriarkiv: Ligament injury in the ankle joint, inner ligament

KONDITION

step4

Training ladder for:
INNER LIGAMENT INJURY IN THE ANKLE JOINT
(RUPTURA TRAUMATICA LIGAMENTI DELTOIDEI PEDIS)

STEP 4

KONDITION
Unlimited: Cycling. Cycling. Swimming. Running with directional change.

UDSPÆNDING
(10 min)

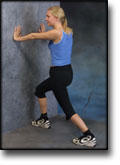
Stand with the injured leg stretched backwards with the toes facing front. Slowly bend the knee so that the calf muscles become increasingly stretched. Hold the position for 20 seconds and relax for 20 seconds before repeating.

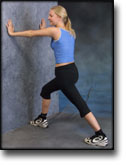
Stand with the injured leg outstretched with the ankle joint bent up against the wall. Press your abdomen against the wall so that the calf muscles become increasingly stretched. Hold the position for 20 seconds and relax for 20 seconds before repeating.

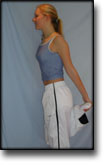
Stand on the good leg while gaining support on the wall with the hand on the same side. Bend the knee of the injured leg and draw the heel towards the buttocks. Take hold of the big toe side of the foot and draw slowly upwards so that the ankle joint is stretched to the maximum and drawn slightly outwards so that increased stretching is experienced on the inside of the shin bone. Hold the position for 20 seconds and relax for 20 seconds before repeating.

Stand on the good leg while gaining support from the wall with the opposite hand. Bend the knee of the injured leg and draw the heel towards the buttocks. Take hold of the little toe side of the foot and draw slowly upwards so that the ankle joint is stretched to the maximum and drawn over the good leg so that increased stretching is experienced on the outer side of the shin bone. Hold the position for 20 seconds and relax for 20 seconds before repeating.

KOORDINATION
(15 min)

Stand on the leg to be trained. Take-off and land on the same leg.

Seesaw. Balance on two legs, possibly using a hand as support against the wall, balancing subsequently on one leg without support. Look straight ahead and keep knees bent.

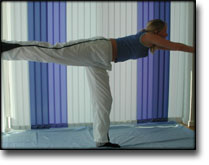
Stand on the injured leg with your upper body bent forwards at 90 degrees. Lift the good leg in a straight line behind you. When you feel comfortable with the exercise, it can be made more difficult by closing your eyes.

STYRKE
(35 min)

Sit on the floor. Tip the foot up and down with elastic under the forefoot so that the elastic becomes taut.

Sit on the floor. Tip the foot up and down with elastic on top of the forefoot so that the elastic becomes taut.

Sit on the floor. Tip the foot from side to side with elastic on the outer side of the foot, without moving the knee.

Sit on the floor. Tip the foot from side to side with elastic on the inner side of the foot, without moving the knee.

Stand behind a chair. Rise slowly up on tiptoe and go down again.

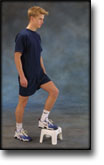
Up and down from the stool with load. Tie elastic around the hip and go up on the stool in a slow movement. The elastic should be fastened to the wall.

Go up and down from the stool. Go up with alternating right and left legs.

Stand on the healthy leg with elastic fixed around the hip. The elastic should be fixed to the wall or a wall bar. Take-off on the healthy leg and land on the leg to be trained and keep your balance. Remember that the elastic should be positioned so that it gives resistance at the moment of take-off. Change legs.

Stand with both legs on the stool with elastic around the hip. Take-off and land with feet together.

Stand with feet together. Using the ankle joint to take off, hop approx. 5 cm and land on both feet. The exercise should be done on one leg when you are able to do it without discomfort using both legs.

Stretching is carried out in the following way: stretch the muscle group for 3-5 seconds. Relax for 3-5 seconds. The muscle group should subsequently be stretched for 20 seconds. The muscle is allowed to be tender, but must not hurt. Relax for 20 seconds, after which the procedure can be repeated. The time consumed for stretching, coordination and strength training can be altered depending on the training opportunities available and individual requirements.

KONDITION

step3

Training ladder for:
INNER LIGAMENT INJURY IN THE ANKLE JOINT
(RUPTURA TRAUMATICA LIGAMENTI DELTOIDEI PEDIS)

STEP 3

KONDITION
Unlimited: Cycling. Cycling. Swimming. Running straight ahead (without directional change).

UDSPÆNDING
(10 min)

Stand with the injured leg stretched backwards with the toes facing front. Slowly bend the knee so that the calf muscles become increasingly stretched. Hold the position for 20 seconds and relax for 20 seconds before repeating.

Stand with the injured leg outstretched with the ankle joint bent up against the wall. Press your abdomen against the wall so that the calf muscles become increasingly stretched. Hold the position for 20 seconds and relax for 20 seconds before repeating.

Stand on the good leg while gaining support on the wall with the hand on the same side. Bend the knee of the injured leg and draw the heel towards the buttocks. Take hold of the big toe side of the foot and draw slowly upwards so that the ankle joint is stretched to the maximum and drawn slightly outwards so that increased stretching is experienced on the inside of the shin bone. Hold the position for 20 seconds and relax for 20 seconds before repeating.

Stand on the good leg while gaining support from the wall with the opposite hand. Bend the knee of the injured leg and draw the heel towards the buttocks. Take hold of the little toe side of the foot and draw slowly upwards so that the ankle joint is stretched to the maximum and drawn over the good leg so that increased stretching is experienced on the outer side of the shin bone. Hold the position for 20 seconds and relax for 20 seconds before repeating.

KOORDINATION
(15 min)

Stand on the leg to be trained. Take-off and land on the same leg.

Seesaw. Balance on two legs, possibly using a hand as support against the wall, balancing subsequently on one leg without support. Look straight ahead and keep knees bent.

Stand on the injured leg with your upper body bent forwards at 90 degrees. Lift the good leg in a straight line behind you. When you feel comfortable with the exercise, it can be made more difficult by closing your eyes.

STYRKE
(35 min)

Sit on the floor. Tip the foot up and down with elastic under the forefoot so that the elastic becomes taut.

Sit on the floor. Tip the foot up and down with elastic on top of the forefoot so that the elastic becomes taut.

Sit on the floor. Tip the foot from side to side with elastic on the outer side of the foot, without moving the knee.

Sit on the floor. Tip the foot from side to side with elastic on the inner side of the foot, without moving the knee.

Stand behind a chair. Rise slowly up on tiptoe and go down again.

Up and down from the stool with load. Tie elastic around the hip and go up on the stool in a slow movement. The elastic should be fastened to the wall.

Go up and down from the stool. Go up with alternating right and left legs.

Stand on the healthy leg with elastic fixed around the hip. The elastic should be fixed to the wall or a wall bar. Take-off on the healthy leg and land on the leg to be trained and keep your balance. Remember that the elastic should be positioned so that it gives resistance at the moment of take-off. Change legs.

Stand with both legs on the stool with elastic around the hip. Take-off and land with feet together.

Stretching is carried out in the following way: stretch the muscle group for 3-5 seconds. Relax for 3-5 seconds. The muscle group should subsequently be stretched for 20 seconds. The muscle is allowed to be tender, but must not hurt. Relax for 20 seconds, after which the procedure can be repeated. The time consumed for stretching, coordination and strength training can be altered depending on the training opportunities available and individual requirements.

KONDITION

step2

Training ladder for:
INNER LIGAMENT INJURY IN THE ANKLE JOINT
(RUPTURA TRAUMATICA LIGAMENTI DELTOIDEI PEDIS)

STEP 2

KONDITION
Unlimited: Cycling. Cycling. Swimming. Light running straight ahead (without directional change) on a smooth surface.

UDSPÆNDING
(10 min)

Stand with the injured leg stretched backwards with the toes facing front. Slowly bend the knee so that the calf muscles become increasingly stretched. Hold the position for 20 seconds and relax for 20 seconds before repeating.

Stand with the injured leg outstretched with the ankle joint bent up against the wall. Press your abdomen against the wall so that the calf muscles become increasingly stretched. Hold the position for 20 seconds and relax for 20 seconds before repeating.

Stand on the good leg while gaining support on the wall with the hand on the same side. Bend the knee of the injured leg and draw the heel towards the buttocks. Take hold of the big toe side of the foot and draw slowly upwards so that the ankle joint is stretched to the maximum and drawn slightly outwards so that increased stretching is experienced on the inside of the shin bone. Hold the position for 20 seconds and relax for 20 seconds before repeating.

Stand on the good leg while gaining support from the wall with the opposite hand. Bend the knee of the injured leg and draw the heel towards the buttocks. Take hold of the little toe side of the foot and draw slowly upwards so that the ankle joint is stretched to the maximum and drawn over the good leg so that increased stretching is experienced on the outer side of the shin bone. Hold the position for 20 seconds and relax for 20 seconds before repeating.

KOORDINATION
(15 min)

Stand on one leg. Play the ball up against the wall.

Stand on one leg on the floor or a mattress. Look straight ahead and keep the knee slightly bent.

Seesaw. Balance on two legs, possibly using a hand as support against the wall, balancing subsequently on one leg without support. Look straight ahead and keep knees bent.

STYRKE
(35 min)

Sit on the floor. Tip the foot up and down with elastic under the forefoot so that the elastic becomes taut.

Sit on the floor. Tip the foot up and down with elastic on top of the forefoot so that the elastic becomes taut.

Sit on the floor. Tip the foot from side to side with elastic on the outer side of the foot, without moving the knee.

Sit on the floor. Tip the foot from side to side with elastic on the inner side of the foot, without moving the knee.

Stand behind a chair. Rise slowly up on tiptoe and go down again.

Up and down from the stool with load. Tie elastic around the hip and go up on the stool in a slow movement. The elastic should be fastened to the wall.

Go up and down from the stool. Go up with alternating right and left legs.

Stand with both legs on the stool with elastic around the hip. Take-off and land with feet together.

Stretching is carried out in the following way: stretch the muscle group for 3-5 seconds. Relax for 3-5 seconds. The muscle group should subsequently be stretched for 20 seconds. The muscle is allowed to be tender, but must not hurt. Relax for 20 seconds, after which the procedure can be repeated. The time consumed for stretching, coordination and strength training can be altered depending on the training opportunities available and individual requirements.

KONDITION

step1

Training ladder for:
INNER LIGAMENT INJURY IN THE ANKLE JOINT
(RUPTURA TRAUMATICA LIGAMENTI DELTOIDEI PEDIS)

STEP 1

The indications of time after stretching, coordination training and strength training show the division of time for the respective type of training when training for a period of one hour. The time indications are therefore not a definition of the daily training needs, as the daily training is determined on an individual basis.

KONDITION
Unlimited: Cycling. Swimming. Running in deep water.

UDSPÆNDING
(10 min)

Stand with the injured leg stretched backwards with the toes facing front. Slowly bend the knee so that the calf muscles become increasingly stretched. Hold the position for 20 seconds and relax for 20 seconds before repeating.

Stand with the injured leg outstretched with the ankle joint bent up against the wall. Press your abdomen against the wall so that the calf muscles become increasingly stretched. Hold the position for 20 seconds and relax for 20 seconds before repeating.

Stand on the good leg while gaining support on the wall with the hand on the same side. Bend the knee of the injured leg and draw the heel towards the buttocks. Take hold of the big toe side of the foot and draw slowly upwards so that the ankle joint is stretched to the maximum and drawn slightly outwards so that increased stretching is experienced on the inside of the shin bone. Hold the position for 20 seconds and relax for 20 seconds before repeating.

Stand on the good leg while gaining support from the wall with the opposite hand. Bend the knee of the injured leg and draw the heel towards the buttocks. Take hold of the little toe side of the foot and draw slowly upwards so that the ankle joint is stretched to the maximum and drawn over the good leg so that increased stretching is experienced on the outer side of the shin bone. Hold the position for 20 seconds and relax for 20 seconds before repeating.

KOORDINATION
(10 min)

Stand on one leg on the floor or a mattress. Look straight ahead and keep the knee slightly bent.

STYRKE
(40 min)

Sit on the floor. Tip the foot up and down with elastic under the forefoot so that the elastic becomes taut.

Sit on the floor. Tip the foot up and down with elastic on top of the forefoot so that the elastic becomes taut.

Sit on the floor. Tip the foot from side to side with elastic on the outer side of the foot, without moving the knee.

Sit on the floor. Tip the foot from side to side with elastic on the inner side of the foot, without moving the knee.

Stand on a soft surface. Rise slowly up on tiptoe and go down again.

Go up and down from the stool. Go up with alternating right and left legs.

Sit with a ball under the foot. Roll the ball backwards and forwards and from side to side.

Stand on both legs. Tip the toes on the leg to be trained upwards and down again, whilst having the heel firmly on the floor during the exercise.

Sit on a chair. Keep the heel firmly on the ground and tip the toes up.

Stretching is carried out in the following way: stretch the muscle group for 3-5 seconds. Relax for 3-5 seconds. The muscle group should subsequently be stretched for 20 seconds. The muscle is allowed to be tender, but must not hurt. Relax for 20 seconds, after which the procedure can be repeated. The time consumed for stretching, coordination and strength training can be altered depending on the training opportunities available and individual requirements.

special-article2

SportNetDoc

Interventions for preventing ankle ligament injuries.

Quinn K, Parker P, de Bie R, Rowe B, Handoll H. Cochrane Database Syst Rev 2000;(2):CD000018.

BACKGROUND.
Some sports, for example basketball and soccer, have a very high incidence of ankle injuries, mainly sprains. This contributes to ankle sprains being one of the most commonly treated injuries.

OBJECTIVES.
To assess the effects of interventions used for the prevention of ankle ligament injuries or sprains in physically active individuals from adolescence to middle age.

SEARCH STRATEGY.
We searched the Cochrane Musculoskeletal Injuries Group trials register, MEDLINE (1966 to July 1996), EMBASE (1980 to September 1996), CINAHL (1982 to June 1996), and bibliographies of study reports. We also contacted colleagues and some trialists. Date of the most recent search: March 1997. S

ELECTION CRITERIA.
Randomised or quasi-randomised trials of interventions for the prevention of ankle sprains in physically active individuals from adolescence to middle age were included provided ankle sprains were recorded. Interventions include use of modified footwear and associated supports, adapted training programmes and health education.

DATA COLLECTION AND ANALYSIS.
At least four reviewers independently assessed methodological quality and extracted data. Wherever possible, results of outcome measures were pooled and sub-grouped by history of previous sprain.

MAIN RESULTS.
Five randomised trials with data for 3954 participants were included. All trials involved young, active, mostly male adults participating in high-risk, usually sporting, activities. With the exception of ankle disc training, all prophylactic interventions entailed the application of an external ankle support in the form of a semi-rigid orthosis, air-cast brace or high top shoes. There was a significant reduction in the number of ankle sprains in people allocated external ankle support (Peto odds ratio 0.49; 95% confidence interval 0.37 to 0.66). This reduction was greater for those with a previous history of ankle sprain, but still possible for those without prior sprain. There was no apparent difference in the degree of severity of the ankle sprain prevented nor any change to the incidence of other leg injuries. The protective effect of ‘high-top’ shoes remains to be established. There was limited evidence for reduction in ankle sprain for those with previous ankle sprains who did ankle disc training exercises.

REVIEWER’S CONCLUSIONS.
This review provides good evidence for the beneficial effect of ankle supports in the form of semi-rigid orthoses or air-cast braces to prevent ankle sprain during high-risk sporting activities (e.g. soccer, basketball). Participants with a history of previous sprain can be advised that wearing such supports may reduce the risk of incurring a future sprain. However, any potential prophylactic effect should be balanced against the baseline risk of the activity, the supply and cost of the particular device, and for some, the possible or perceived loss of performance. Further research is indicated principally to investigate other prophylactic interventions and general applicability.

special-article1

SportNetDoc

The prevention of ankle sprains in sports. A systematic review of the literature.

Thacker SB, Stroup DF, Branche CM, Gilchrist J, Goodman RA, Weitman EA. Am J Sports Med 1999 Nov-Dec;27(6):753-60.

To assess the published evidence on the effectiveness of various approaches to the prevention of ankle sprains in athletes, we used textbooks, journals, and experts in the field of sports medicine to identify citations. We identified 113 studies reporting the risk of ankle sprains in sports, methods to provide support, the effect of these interventions on performance, and comparison of prevention efforts. The most common risk factor for ankle sprain in sports is history of a previous sprain. Ten citations of studies involving athletes in basketball, football, soccer, or volleyball compared alternative methods of prevention. Methods tested included wrapping the ankle with tape or cloth, orthoses, high-top shoes, or some combination of these methods. Most studies indicate that appropriately applied braces, tape, or orthoses do not adversely affect performance. Based on our review, we recommend that athletes with a sprained ankle complete supervised rehabilitation before returning to practice or competition, and those athletes suffering a moderate or severe sprain should wear an appropriate orthosis for at least 6 months. Both coaches and players must assume responsibility for prevention of injuries in sports. Methodologic limitations of published studies suggested several areas for future research.

treatment-article

SportNetDoc

Is surgical treatment of deltoid ligament rupture necessary in ankle fractures?

Maynou C, Lesage P, Mestdagh H, Butruille Y. Rev Chir Orthop Reparatrice Appar Mot 1997;83(7):652-7.

PURPOSE OF THE STUDY.
Fractures of the lateral malleolus associated with rupture of the deltoid ligament are severe fractures types. There is still discussion about wether the ruptured deltoid ligament should be sutured or not. To elucidate further the need for surgical repair of this structure a comparative and retrospective review was conducted at a mean follow-up of 4 years and 8 months.

MATERIAL AND METHODS.
Twenty nine men and 15 women were included with a mean age of 34 years. Patients were subdivided into two groups according to the attitude regarding the ligament. In the first group (n = 18), an operative repair of the ligament was made and in the second group (n = 17) we leaved it unrepaired. Nine patients were evaluated separately because of an associated osteochondral fracture (n = 7) or a worse reduction of the fibula (n = 2). Subjective and objective clinical assessment were evaluated according to a modified Cedell classification. Roentgenograms including A.P, lateral, mortise view and a external rotation stress view described by Kleiger were obtained in all patients.

RESULTS.
Subjective and objective analysis showed no significant difference between the two groups, likewise no differences were observed for post operative complications rate. Medial instability was observed in four cases (2 in group 1 and 2 in group II). Roentgenographicaly, more ossifications of the deltoid ligament were founded in group II (p = 0.013), and only one degenerative osteoarthritis of the ankle was seen in group II. Clinical results in the group of patients with osteochondral fracture were statistically worse than in the two previous groups (p = 0.001), with frequent progression to osteoarthritis in four cases.

DISCUSSION.
In our experience it is impossible to advise surgical repair of the deltoid ligament in accordance to the type of lateral malleolar fracture like other authors have suggested. The existence of a significant widening of the medial space greater than 3 mm was nearly correlated with a deltoid ligament disruption, of the 23 patients treated with a medial approach, the ligament was ruptured in 22 cases. In this study, we may conclude than an untreated rupture of the deltoid ligament does not lead to instability. The advantages of the deltoid repair may be obtained if the fixation of the lateral malleolus allows a perfect congruency of the mortise. The most predictive radiographic factors for a poor outcome were a persistent widening of the medial joint greater than 3 mm, an associated osteochondral fracture and a poor reduction of the lateral malleolus which results in degenerative arthritis of the ankle at long term follow-up.

CONCLUSION.
Repair of the deltoid ligament is unnecessary if the internal fixation of the fibula achieves an anatomical reconstitution of the mortise. Exploration of the medial side is indicated only with a medial incongruency greater than 3 mm on intra operative roentgenograms.

spacial-article

SportNetDoc

The effect of preventive measures on the incidence of ankle sprains.

Verhagen EA, van Mechelen W, de Vente W. Clin J Sport Med 2000 Oct;10(4):291-6.

OBJECTIVE.
To critically review the current data concerning the efficacy of preventive measures described in the literature, on the incidence of lateral ankle ligament injuries.

DATA SOURCES.
MEDLINE, Sportdiscus, and EMBASE were searched for papers published between 1980 and December 1998. Keywords used in the search were “prevention” in combination with “ankle,” “ankle taping,” “ankle bracing,” “orthosis,” “shoes,” and “proprioception.” Additional references were reviewed from the bibliographies of the retrieved articles.

STUDY SELECTION.
A study was included if: 1) the study contained research questions regarding the prevention of lateral ankle ligament injuries; 2) the study was a randomized controlled trial, a controlled trail, or a time intervention; 3) the results of the study contained incidence rates of lateral ankle ligament injuries as study outcome; and 4) the study met the cut-off score set for quality.

DATA EXTRACTION AND SYNTHESIS.
Two reviewers reviewed relevant studies for strengths and weaknesses in design and methodology, according to a standardized set of predefined criteria. Eight relevant studies met the criteria for inclusion and were analyzed.

MAIN RESULTS.
Overall, all studies reported a significant decrease in incidence of ankle sprains using the studied preventive measure. There was a great variety in methodology and study design between the eight analyzed studies, and every study had one or more drawbacks. Therefore, between studies only general results could be compared.

CONCLUSIONS.
The use of either tape or braces reduces the incidence of ankle sprains. Next to this preventive effect, the use of tape or braces results in less severe ankle sprains. However, braces seem to be more effective in preventing ankle sprains than tape. It is not clear which athletes are to benefit more from the use of preventive measures: those with or those without previous ankle sprains. The efficacy of shoes in preventing ankle sprains is unclear. It is likely the newness of the footwear plays a more important role than shoe height in preventing ankle sprains. Proprioceptive training reduces the incidence of ankle sprains in athletes with recurrent ankle sprains to the same level as subjects without any history of ankle sprains.

tape-description


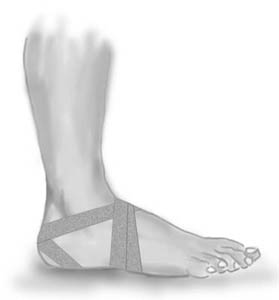
Objective: Stabilise the ankle joint (talocrural and subtalar joints) against too great a lateral twist (supination and pronation) without reducing the normal mobility of the ankle joint (plantar and dorsal flexion). With a heavy sprain the applications include “stirrups”, “ankle lock” and possibly “figure-8”, however, light sprains normally require just “stirrups”.
The tape is utilised the whole day in the beginning of the course, being gradually reduced over the following three months. The tape is finally only used in connection with particular loads where there is risk attached.

Type: ANKLE TAPE – LATERAL STABILISATION:
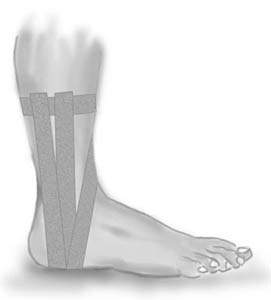
“STIRRUP”
Application: The foot should be kept in a neutral position when applying the tape, at an angle of 90 degrees from the lower leg. One or two tape anchors are applied around the lower leg 10-20 cm above the ankle joint (A), followed by application of three stirrups. The stirrups are started from the anchor on the inner side of the leg if it is the outer tendons that are injured (95%), and the other way around in the rare cases where it is the inner tendons that are damaged. The stirrups are taken under the heel and drawn up to the anchor on the outer side of the leg. When applying the stirrups the outer border of the foot is pushed slightly up, whilst at the same time pulling the border slightly up with the tape. A stirrup (B) is applied with the rear half of the outer ankle knuckle directly under the tape. A sloping stirrup (D) starts from the anchor on the front side of the leg slanting down over the lower leg over the front half of the inner ankle knuckle, under the foot and over the front half of the outer ankle knuckle, and slanting in over the leg up to the anchor. Finish with a further strip on top of the anchor A.

Type: ANKLE TAPE – LATERAL STABILISATION:
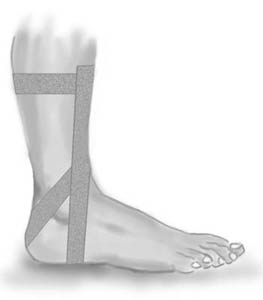
“ANKLE LOCK”
Application: One or two tape anchors are fixed around the lower leg 10-20 cm above the ankle joint (A). Begin on the anchor on the inner side of the leg, draw the tape forward in front of the leg, down over the outer ankle knuckle, behind the heel directly under the Achilles tendon, down under the heel and up over the outer side of the leg to the anchor. The ankle lock can be applied the other way around if the inner tendon is damaged. Finish with a further strip on top of the anchor A.


Type: ANKLE TAPE – LATERAL STABILISATION:
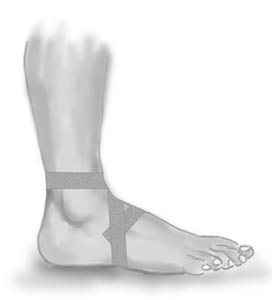
“FIGURE-8 BANDAGE”
Application: Begin just in front of the ankle joint and draw the tape in under the arch of the foot on the inner side, and up over the outer side, continuing over the start tape in front of the ankle joint and round behind the leg and back again to finish in front of the ankle joint.


Type: ANKLE TAPE – LATERAL STABILISATION:
“DOUBLE FIGURE-8 BANDAGE”


Especially used with sprains of the tendon in the front of the ankle joint (lig. tibiofibular anterior), where pain is experienced when flexing the foot powerfully upwards (dorsal flexion).
This tape must be rolled loosely on, and must not be drawn tight. If the tape becomes tight all the same, which often happens, it must be loosened.

Application: Start at the back of the foot just in front of the ankle joint and draw the tape down around the outer border of the foot (A), under the sole and up to the back of the foot. Continue over the lower part of the ankle knuckle behind the heel under the Achilles tendon (B). The tape crosses down under the inner side of the heel and up to the outer border of the foot (C). The tape continues over the lower part of the inner ankle knuckle behind the heel under the Achilles tendon. The tape crosses the earlier tape, goes down under the outer side of the heel (D) and up to the inner border of the foot to finish on the back of the foot.