Objective: Stabilise the ankle joint (talocrural and subtalar joints) against too great a lateral twist (supination and pronation) without reducing the normal mobility of the ankle joint (plantar and dorsal flexion). With a heavy sprain the applications include “stirrups”, “ankle lock” and possibly “figure-8”, however, light sprains normally require just “stirrups”. The tape is utilised the whole day in the beginning of the course, being gradually reduced over the following three months. The tape is finally only used in connection with particular loads where there is risk attached. |
|
|||
 |
|||
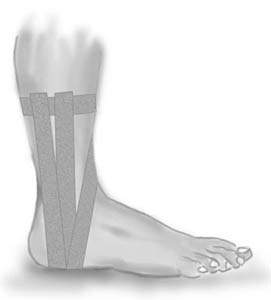
| Application: The foot should be kept in a neutral position when applying the tape, at an angle of 90 degrees from the lower leg. One or two tape anchors are applied around the lower leg 10-20 cm above the ankle joint (A), followed by application of three stirrups. The stirrups are started from the anchor on the inner side of the leg if it is the outer tendons that are injured (95%), and the other way around in the rare cases where it is the inner tendons that are damaged. The stirrups are taken under the heel and drawn up to the anchor on the outer side of the leg. When applying the stirrups the outer border of the foot is pushed slightly up, whilst at the same time pulling the border slightly up with the tape. A stirrup (B) is applied with the rear half of the outer ankle knuckle directly under the tape. A sloping stirrup (D) starts from the anchor on the front side of the leg slanting down over the lower leg over the front half of the inner ankle knuckle, under the foot and over the front half of the outer ankle knuckle, and slanting in over the leg up to the anchor. Finish with a further strip on top of the anchor A. |
|
|||
 |
|||
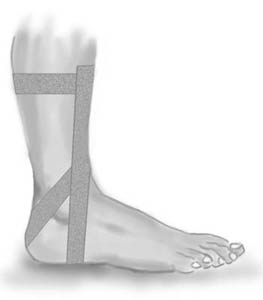
| Application: One or two tape anchors are fixed around the lower leg 10-20 cm above the ankle joint (A). Begin on the anchor on the inner side of the leg, draw the tape forward in front of the leg, down over the outer ankle knuckle, behind the heel directly under the Achilles tendon, down under the heel and up over the outer side of the leg to the anchor. The ankle lock can be applied the other way around if the inner tendon is damaged. Finish with a further strip on top of the anchor A. |
|
|||
 |
|||
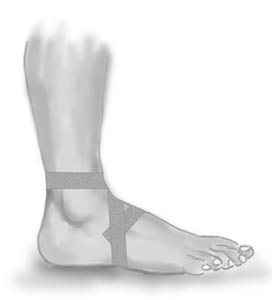
| Application: Begin just in front of the ankle joint and draw the tape in under the arch of the foot on the inner side, and up over the outer side, continuing over the start tape in front of the ankle joint and round behind the leg and back again to finish in front of the ankle joint. |
|
|||
 |
|||
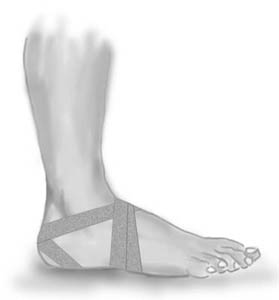
| Application: Start at the back of the foot just in front of the ankle joint and draw the tape down around the outer border of the foot (A), under the sole and up to the back of the foot. Continue over the lower part of the ankle knuckle behind the heel under the Achilles tendon (B). The tape crosses down under the inner side of the heel and up to the outer border of the foot (C). The tape continues over the lower part of the inner ankle knuckle behind the heel under the Achilles tendon. The tape crosses the earlier tape, goes down under the outer side of the heel (D) and up to the inner border of the foot to finish on the back of the foot. |