Alle indlæg af urtehave_com

KONDITION

step3

Training ladder for:
JUMPER’S KNEE
(JUMPER´S KNEE)

STEP 3

KONDITION
Unlimited: Cycling with weak load. Swimming. Running with increasing distance on a soft surface.

UDSPÆNDING
(15 min)

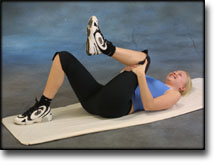
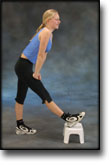
Lie on your back. Draw the injured leg up towards your head so that the muscles in the back of the thigh become increasingly stretched. Perform the exercise with outstretched as well as bent knee. Hold the position for 20 seconds and relax for 20 seconds before repeating. The exercise can also be performed standing with the injured leg outstretched on a chair while the upper body is bent slightly forwards.

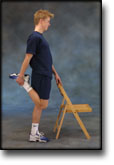
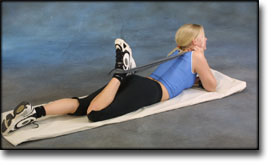
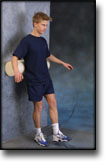
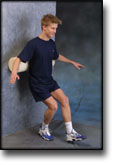
Stand with support from the back of a chair or the wall. Using your hand, bend the knee and draw the foot up and your knee slightly backwards so that the muscles in the front of the thigh become increasingly stretched. Hold the position for 20 seconds and relax for 20 seconds before repeating. The exercise can also be done lying down. If you lie on your stomach you can draw the foot up by using a towel.

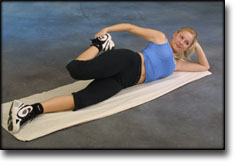
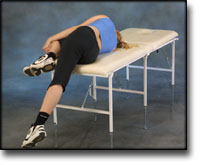
Lie on your side on a table. Bend one leg up under your body and let the other hang over the edge of the table so that the muscles in the outer side of the thigh become increasingly stretched. Hold the position for 20 seconds and relax for 20 seconds before repeating. The exercise can also be done standing by placing the outstretched injured leg behind the good leg at the same time as bending over the injured leg.

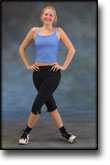
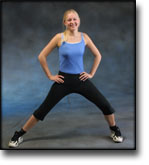
Stand with one leg outstretched and the other slightly bent. Thrust your weight to the side over the bent leg so that the inner side of the opposite thigh becomes increasingly stretched. Hold the position for 20 seconds and relax for 20 seconds before repeating.

KOORDINATION
(5 min)

Seesaw. Balance on two legs, possibly using a hand as support against the wall, balancing subsequently on one leg without support. Look straight ahead and keep knees bent.

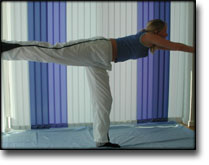
Stand on the injured leg with your upper body bent forwards at 90 degrees. Lift the good leg in a straight line behind you. When you feel comfortable with the exercise, it can be made more difficult by closing your eyes.

STYRKE
(40 min)

Sit on a chair with elastic around the ankle, facing the elastic. Lift the leg and slowly bend and stretch the knee.

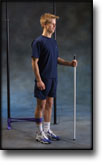
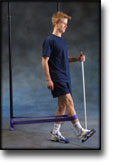
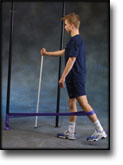
Stand with the elastic around the injured leg, facing away from the elastic. Move the leg forwards and slowly backwards. The elastic can be moved up and down the leg depending upon the strength of the knee – the stronger the knee, the lower the elastic should be.

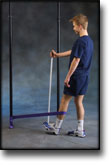
Stand with the elastic around the injured leg, facing towards the elastic. Move the leg backwards and slowly forwards. The elastic can be moved up and down the leg depending upon the strength of the knee – the stronger the knee, the lower the elastic should be.

Stand on the healthy leg with the elastic around the inside of the injured leg. Move the injured leg from side to side in a slow smooth movement. Moving the position of the elastic lower down the leg can increase the load.

Stand on the healthy leg with the elastic around the outside of the injured leg. Move the injured leg from side to side in a slow smooth movement. Moving the position of the elastic lower down the leg can increase the load.

Lie on the floor with slightly bent knees. Put the elastic under the foot and hold firmly with your hands. Stretch the knee so that the elastic is drawn tight and slowly bend the knee again.

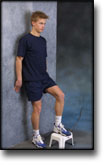
Go up and slowly down from the stool. Go up with the healthy leg first and down with the same leg first. The load can be increased by putting on a rucksack and gradually increasing the ballast in the rucksack.

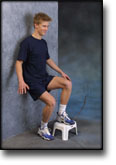
Stand with your back to the wall with your weight on the injured leg. Lift the healthy leg up on a stool. Slowly go down and bend the knee on the injured leg to 90 degrees. Support then with the healthy leg and use both legs to rise again.

Stand on the injured leg up on a stool with the elastic around your waist. Stand facing the wall. Walk backwards up on the stool with the healthy leg first, and slowly down with the healthy leg first.

Stretching is carried out in the following way: stretch the muscle group for 3-5 seconds. Relax for 3-5 seconds. The muscle group should subsequently be stretched for 20 seconds. The muscle is allowed to be tender, but must not hurt. Relax for 20 seconds, after which the procedure can be repeated. The time consumed for stretching, coordination and strength training can be altered depending on the training opportunities available and individual requirements.

KONDITION

step2

Training ladder for:
JUMPER’S KNEE
(JUMPER´S KNEE)

STEP 2

KONDITION
Unlimited: Cycling with weak load. Swimming. Light running on a soft surface.

UDSPÆNDING
(15 min)

Lie on your back. Draw the injured leg up towards your head so that the muscles in the back of the thigh become increasingly stretched. Perform the exercise with outstretched as well as bent knee. Hold the position for 20 seconds and relax for 20 seconds before repeating. The exercise can also be performed standing with the injured leg outstretched on a chair while the upper body is bent slightly forwards.

Stand with support from the back of a chair or the wall. Using your hand, bend the knee and draw the foot up and your knee slightly backwards so that the muscles in the front of the thigh become increasingly stretched. Hold the position for 20 seconds and relax for 20 seconds before repeating. The exercise can also be done lying down. If you lie on your stomach you can draw the foot up by using a towel.

Lie on your side on a table. Bend one leg up under your body and let the other hang over the edge of the table so that the muscles in the outer side of the thigh become increasingly stretched. Hold the position for 20 seconds and relax for 20 seconds before repeating. The exercise can also be done standing by placing the outstretched injured leg behind the good leg at the same time as bending over the injured leg.

Stand with one leg outstretched and the other slightly bent. Thrust your weight to the side over the bent leg so that the inner side of the opposite thigh becomes increasingly stretched. Hold the position for 20 seconds and relax for 20 seconds before repeating.

KOORDINATION
(5 min)

Seesaw. Balance on two legs, possibly using a hand as support against the wall, balancing subsequently on one leg without support. Look straight ahead and keep knees bent.

STYRKE
(40 min)

Sit on a chair with elastic around the ankle, facing the elastic. Lift the leg and slowly bend and stretch the knee.

Stand with the elastic around the injured leg, facing away from the elastic. Move the leg forwards and slowly backwards. The elastic can be moved up and down the leg depending upon the strength of the knee – the stronger the knee, the lower the elastic should be.

Stand with the elastic around the injured leg, facing towards the elastic. Move the leg backwards and slowly forwards. The elastic can be moved up and down the leg depending upon the strength of the knee – the stronger the knee, the lower the elastic should be.

Stand on the healthy leg with the elastic around the inside of the injured leg. Move the injured leg from side to side in a slow smooth movement. Moving the position of the elastic lower down the leg can increase the load.

Stand on the healthy leg with the elastic around the outside of the injured leg. Move the injured leg from side to side in a slow smooth movement. Moving the position of the elastic lower down the leg can increase the load.

Sit on a chair and lift the knee to a horizontal position. Hold for 1 minute, lower the leg to approx. 45 degrees for 30 seconds. Lower again to the starting position.

Sit on a chair with the injured leg on a stool or similar. Lift the leg above the stool with the foot flexed at a maximum, and hold the position for 10 seconds, followed by 10 seconds rest. The exercise should be repeated for approx. 3 minutes.

Go up and slowly down from the stool. Go up with the healthy leg first and down with the same leg first. The load can be increased by putting on a rucksack and gradually increasing the ballast in the rucksack.

Stand on the injured leg up on a stool with the elastic around your waist. Stand facing the wall. Walk backwards up on the stool with the healthy leg first, and slowly down with the healthy leg first.

Stretching is carried out in the following way: stretch the muscle group for 3-5 seconds. Relax for 3-5 seconds. The muscle group should subsequently be stretched for 20 seconds. The muscle is allowed to be tender, but must not hurt. Relax for 20 seconds, after which the procedure can be repeated. The time consumed for stretching, coordination and strength training can be altered depending on the training opportunities available and individual requirements.

KONDITION

step1

Training ladder for:
JUMPER’S KNEE
(JUMPER´S KNEE)

STEP 1

The indications of time after stretching, coordination training and strength training show the division of time for the respective type of training when training for a period of one hour. The time indications are therefore not a definition of the daily training needs, as the daily training is determined on an individual basis.

KONDITION
Unlimited: Cycling with weak load and raised saddle. Swimming.

UDSPÆNDING
(15 min)

Lie on your back. Draw the injured leg up towards your head so that the muscles in the back of the thigh become increasingly stretched. Perform the exercise with outstretched as well as bent knee. Hold the position for 20 seconds and relax for 20 seconds before repeating. The exercise can also be performed standing with the injured leg outstretched on a chair while the upper body is bent slightly forwards.

Stand with support from the back of a chair or the wall. Using your hand, bend the knee and draw the foot up and your knee slightly backwards so that the muscles in the front of the thigh become increasingly stretched. Hold the position for 20 seconds and relax for 20 seconds before repeating. The exercise can also be done lying down. If you lie on your stomach you can draw the foot up by using a towel.

Lie on your side on a table. Bend one leg up under your body and let the other hang over the edge of the table so that the muscles in the outer side of the thigh become increasingly stretched. Hold the position for 20 seconds and relax for 20 seconds before repeating. The exercise can also be done standing by placing the outstretched injured leg behind the good leg at the same time as bending over the injured leg.

Stand with one leg outstretched and the other slightly bent. Thrust your weight to the side over the bent leg so that the inner side of the opposite thigh becomes increasingly stretched. Hold the position for 20 seconds and relax for 20 seconds before repeating.

KOORDINATION
(5 min)

Seesaw. Balance on two legs, possibly using a hand as support against the wall, balancing subsequently on one leg without support. Look straight ahead and keep knees bent.

STYRKE
(40 min)

Sit on a chair with elastic around the ankle, facing the elastic. Lift the leg and slowly bend and stretch the knee.

Stand with the elastic around the injured leg, facing away from the elastic. Move the leg forwards and slowly backwards. The elastic can be moved up and down the leg depending upon the strength of the knee – the stronger the knee, the lower the elastic should be.

Stand with the elastic around the injured leg, facing towards the elastic. Move the leg backwards and slowly forwards. The elastic can be moved up and down the leg depending upon the strength of the knee – the stronger the knee, the lower the elastic should be.

Stand on the healthy leg with the elastic around the inside of the injured leg. Move the injured leg from side to side in a slow smooth movement. Moving the position of the elastic lower down the leg can increase the load.

Stand on the healthy leg with the elastic around the outside of the injured leg. Move the injured leg from side to side in a slow smooth movement. Moving the position of the elastic lower down the leg can increase the load.

Sit on a chair and lift the knee to a horizontal position. Hold for 1 minute, lower the leg to approx. 45 degrees for 30 seconds. Lower again to the starting position.

Sit on a chair with the injured leg on a stool or similar. Lift the leg above the stool with the foot flexed at a maximum, and hold the position for 10 seconds, followed by 10 seconds rest. The exercise should be repeated for approx. 3 minutes.

Go up and slowly down from the stool. Go up with the healthy leg first and down with the same leg first. The load can be increased by putting on a rucksack and gradually increasing the ballast in the rucksack.

Stretching is carried out in the following way: stretch the muscle group for 3-5 seconds. Relax for 3-5 seconds. The muscle group should subsequently be stretched for 20 seconds. The muscle is allowed to be tender, but must not hurt. Relax for 20 seconds, after which the procedure can be repeated. The time consumed for stretching, coordination and strength training can be altered depending on the training opportunities available and individual requirements.

tape-instruction

Tapening


Type: JUMPER’S KNEE:

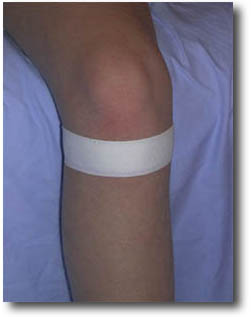
Objective: The load on the tendon fastening can be adjusted with use of tape, so that the maximum load is moved to another part of the tendon fastening allowing the injured part to be relieved.

Application: One or two tape “anchors” are applied around the lower leg just below the lower edge of the kneecap. The tape must not be fixed so tightly so as to cause any discomfort from the lower leg or foot (cold sensation, sleeping sensation).

treatment-article

SportNetDoc

Studies of surgical outcome after patellar tendinopathy: clinical significance of methodological deficiencies and guidelines for future studies. Victorian Institute of Sport Tendon Study Group.

Coleman BD, Khan KM, Maffulli N, Cook JL, Wark JD. Scand J Med Sci Sports 2000 Feb;10(1):2-11.

Patellar tendinopathy is often treated surgically after failure of conservative treatment but clinical experience suggests that results are not uniformly excellent. The aim of this review was to (i) identify the different surgical techniques that have been reported and compare their success rates, and (ii) critically assess the methodology of studies that have reported surgical outcomes. Twenty-three papers and two abstracts were included in the review. Surgical procedures were categorized and outcomes summarized. Using ten criteria, an overall methodology score was derived for each paper. Criteria for which scores were generally low (indicating methodological deficiency) concerned the type of study, subject selection process and outcome measures. We found a negative correlation between papers’ reported success rates and overall methodology scores (r= -0.57, P<0.01). There was a positive correlation between year of publication and overall methodology score (r=0.68, P<0.001). We conclude that study methodology may influence reported surgical outcome. We suggest practical guidelines for improving study design in this area of clinical research, as improved study design would provide clinicians with a more rigorous evidence-base for treating patients who have recalcitrant patellar tendinopathy.

treatment-article2

SportNetDoc

Ultrasonography as a tool for diagnosis, guidance of local steroid injection and, together with pressure algometry, monitoring of the treatment of athletes with chronic jumper’s knee and Achilles tendinitis: a randomized, double-blind, placebo-controlled study.

Fredberg U, Bolvig L, Pfeiffer-Jensen M, Clemmensen D, Jakobsen BW, Stengaard-Pedersen K. Scand J Rheumatol. 2004;33(2):94-101.

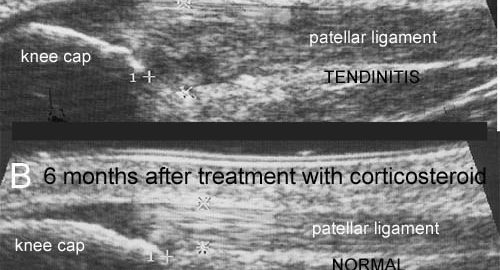
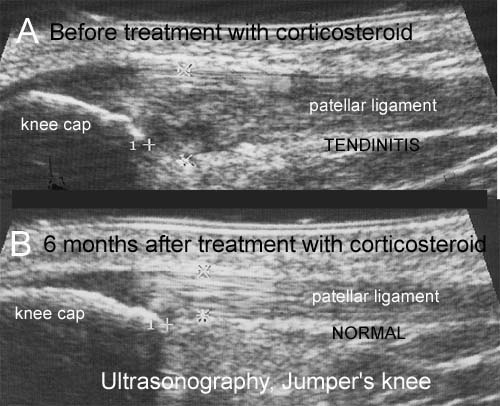
BACKGROUND: The diagnosis of Achilles and patella tendinitis has until recently been based on clinical examination, and treatment with local steroid injection has been given blindly. This is the first randomized, double blind, placebo-controlled study of local steroid injection in athletes with chronic tendinitis, which used ultrasonography to increase diagnostic accuracy, to guide the correct placement of local steroid and, conjunctively with pressure algometry, to objectify and monitor the results of treatment. METHOD: Forty-eight athletes each with severe symptomatic tendinitis of a patellar (24) or Achilles tendon (24) for more than 6 months, whose conditions were confirmed ultrasonographically, and who all failed conservative treatment (rehabilitation) were included in this double-blind, placebo-controlled study and treated with three ultrasonographically guided peritendinous injections of steroid or placebo. RESULTS: The conditions of only one-third of the referred athletes with clinically suspected tendinitis were confirmed by ultrasonographic examination. The ultrasonographically guided peritendinous injection of steroid had a significant effect in reducing pain and thickening of tendons. CONCLUSION: Ultrasonography should be used in the future to assure precise diagnosis and to guide the peritendinous injection of steroid in chronic Achilles and patella tendinitis. Ultrasonography and pressure algometry are recommended as objective methods for monitoring the effect of treatment. Ultrasonographically guided injection of long-acting steroid can normalize the ultrasonographic pathological lesions in the Achilles and patellar tendons, and has a dramatic clinical effect but when combined with aggressive rehabilitation with running after a few days, many will have relapse of symptoms within 6 months (see the article – 1,5 mb).

treatment-article1

SportNetDoc

Jumper’s knee. Review of the literature.

Fredberg U, Bolvig L. Scand J Med Sci Sports 1999 Apr;9(2):66-73.

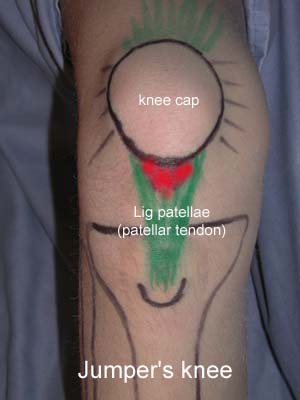
Jumper’s knee is an overuse disease. The initial subjective complaints are well-localized pain, usually occurring after physical activities and often at the lower pole of the patella. The diagnosis of jumper’s knee is usually easily established after acquiring a detailed history and a carefully performed physical examination, but the lesion can be mistaken for other disorders or injuries, such as bursitis, meniscal injuries or chondromalacia (1) or other causes of the patellofemoral pain syndrome. Today ultrasonography is the method of choice for the evaluation of jumper’s knee as it is both time and cost saving, non-invasive, repeatable, accurate and allows a dynamic image of the tendon, guided injections and control of treatment. Conservative therapy is the treatment of choice in the early stages and includes adequate warm-up, stretching of the quadriceps muscle and physical activity with respect to the pain, and ice pack application after activity. When the pain disappears, the training intensity can be increased. NSAID (Non-Steroidal Anti-Inflammatory Drugs) and local peritendinous injections with long-acting steroids can be a helpful and safe adjuvant to the conservative treatment and should be tried before surgery. Surgical treatment is indicated only if a prolonged and well-supervised conservative treatment program fails in chronic jumper’s knee (including local injection with steroid) or in acute total rupture. Review papers concerning jumper’s knee are already published (2-5), but in this review the importance of ultrasonography to make the diagnosis, to plan therapy and control the treatment and the safety of peritendinous injection with steroid is pointed out. The scientific documentation for the recommanded treatment (conservative, steroid injection and operation) is, however, insufficient. Many more controlled studies are needed. Ultrasonography and placebo-controlled, double-blinded, cross-over studies for treatment with local injection of steroid are ongoing (6, 7).

KONDITION

step4

Training ladder for:
RUPTURE OF THE KNEE CAP LIGAMENT
(RUPTURA LIGAMENTUM PATELLAE)

STEP 4

The following exercises can only be considered as a supplement to the guidelines furnished by the doctor which performed the operation. Specific precautions are necessary as the operation can be complicated.
KONDITION
Unlimited: Cycling. Swimming. Running.

UDSPÆNDING
(10 min)

Lie on your back. Draw the injured leg up towards your head so that the muscles in the back of the thigh become increasingly stretched. Perform the exercise with outstretched as well as bent knee. Hold the position for 20 seconds and relax for 20 seconds before repeating. The exercise can also be performed standing with the injured leg outstretched on a chair while the upper body is bent slightly forwards.

Stand with support from the back of a chair or the wall. Using your hand, bend the knee and draw the foot up and your knee slightly backwards so that the muscles in the front of the thigh become increasingly stretched. Hold the position for 20 seconds and relax for 20 seconds before repeating. The exercise can also be done lying down. If you lie on your stomach you can draw the foot up by using a towel.

Lie on your side on a table. Bend one leg up under your body and let the other hang over the edge of the table so that the muscles in the outer side of the thigh become increasingly stretched. Hold the position for 20 seconds and relax for 20 seconds before repeating. The exercise can also be done standing by placing the outstretched injured leg behind the good leg at the same time as bending over the injured leg.

Stand with one leg outstretched and the other slightly bent. Thrust your weight to the side over the bent leg so that the inner side of the opposite thigh becomes increasingly stretched. Hold the position for 20 seconds and relax for 20 seconds before repeating.

KOORDINATION
(5 min)

Seesaw. Balance on two legs, possibly using a hand as support against the wall, balancing subsequently on one leg without support. Look straight ahead and keep knees bent.

Stand on the injured leg with your upper body bent forwards at 90 degrees. Lift the good leg in a straight line behind you. When you feel comfortable with the exercise, it can be made more difficult by closing your eyes.

STYRKE
(45 min)

Sit on a chair with elastic around the ankle, facing the elastic. Lift the leg and slowly bend and stretch the knee.

Sit on a chair with elastic attached to the ankle. Raise the leg and slowly stretch and bend the knee.

Stand on the healthy leg with the elastic around the inside of the injured leg. Move the injured leg from side to side in a slow smooth movement. Moving the position of the elastic lower down the leg can increase the load.

Stand on the healthy leg with the elastic around the outside of the injured leg. Move the injured leg from side to side in a slow smooth movement. Moving the position of the elastic lower down the leg can increase the load.

Lie on the floor with slightly bent knees. Put the elastic under the foot and hold firmly with your hands. Stretch the knee so that the elastic is drawn tight and slowly bend the knee again.

Up and down from the stool with load. Tie elastic around the hip and go up on the stool in a slow movement. The elastic should be fastened to the wall.

Stand with your back against a wall with a ball or firm round cushion between the wall and your back. Slowly go down to bend your knee 90 degrees before slowly rising up again.

Lie on your back with a ball or firm round cushion under the injured leg. Lift your backside up from the floor and stretch the healthy leg. Hold the position for a few seconds.

Stretching is carried out in the following way: stretch the muscle group for 3-5 seconds. Relax for 3-5 seconds. The muscle group should subsequently be stretched for 20 seconds. The muscle is allowed to be tender, but must not hurt. Relax for 20 seconds, after which the procedure can be repeated. The time consumed for stretching, coordination and strength training can be altered depending on the training opportunities available and individual requirements.