Alle indlæg af urtehave_com

examination-article2

SportNetDoc

US of the snapping iliopsoas tendon.

Cardinal E, Buckwalter KA, Capello WN, Duval N. Radiology. 1996 Feb;198(2):521-2.

PURPOSE.
To determine the value of ultrasound (US) in the diagnosis of snapping iliopsoas tendon.

MATERIALS AND METHODS.
In three patients, dynamic US of the hip was performed as the flexed, abducted, and externally rotated hip was extended. The contralateral hip was also evaluated. Hip arthrography was performed in all three patients, magnetic resonance imaging in two, and iliopsoas bursography in two, which was successful in only one case. One patient underwent surgical release of the iliopsoas tendon.

RESULTS.
At US, an abnormal jerk of the iliopsoas tendon during hip motion was correlated with the painful audible snap. The motion of the contralateral iliopsoas tendon was smooth. No intraarticular abnormality was found in two patients, and an associated labral tear was suspected at arthrography in the third patient. The patient who underwent surgical release of the iliopsoas tendon had great improvement.

CONCLUSION.
US is a useful dynamic noninvasive technique for the diagnosis of snapping iliopsoas tendo.

examination-article1

SportNetDoc

The snapping hip: clinical and imaging findings in transient subluxation of the iliopsoas tendon.

Janzen DL, Partridge E, Logan PM, Connell DG, Duncan CP. Can Assoc Radiol J 1996 Jun;47(3):202-8.

OBJECTIVE.
To define the clinical, ultrasonographic and magnetic resonance imaging (MRI) findings in patients with painful snapping of the hip secondary to transient subluxation of the iliopsoas tendon.

PATIENTS AND METHODS.
Seven patients, ranging in age from 17 to 30 years, with a total of eight painful snapping hips were examined with static and dynamic ultrasonography and MRI during hip motion producing the painful snapping. The duration of symptoms, the level of disability and the response to therapy were recorded.

RESULTS.
Static ultrasonography showed thickening of the iliopsoas tendon (tendinitis) in two cases and a peritendinous fluid collection in two cases. In all cases dynamic ultrasonography of the iliopsoas tendon during hip motion showed distinct abnormal motion of the tendon corresponding temporally to the painful palpable and audible sensation. MRI showed normal intra-articular structures in all cases, tendinitis in two cases and iliopsoas bursitis in one case. Clinically, subluxation of the iliopsoas tendon is a chronic (mean duration of symptoms in this series, 23 months) disabling condition that may be relieved by surgical tendon release.

CONCLUSIONS.
Dynamic ultrasonography is useful for detecting transient subluxation of the iliopsoas tendon in patients with a painful snapping hip. MRI is useful for excluding intra-articular abnormalities in patients with this condition.

bursitis

BURSITIS

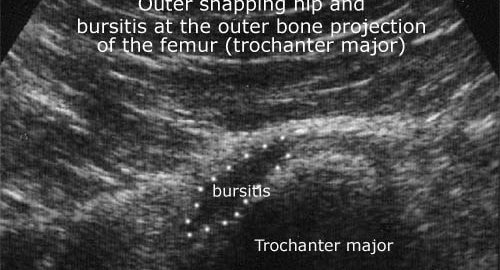
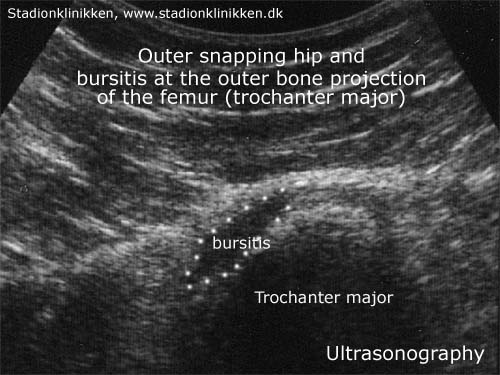
Diagnosis: BURSITIS
(Inflammation of the bursa)


Anatomy:
There are numerous bursas around the hip joint, serving the purpose of reducing the pressure on muscles, tendons and ligaments where these lie close to a bone projection.

Cause: In case of repeated loads or blows, the bursa can produce additional fluid, swell and become inflamed and painful.

Symptoms: Pain when applying pressure on the bursa, which sometimes (but far from always) can feel swollen. Pain is aggravated upon activation of the muscle closest to the bursa.

Acute treatment: Click here.

Examination: In light cases with only minimal tenderness, medical examination is not necessarily required. In case of more pronounced pain or lack of progress, a medical examination should be carried out to ensure the correctness of the diagnosis and the commencement of any treatment. The diagnosis is most easily and quickly made with ultrasound (which allows simultaneous treatment).

Treatment: The treatment primarily comprises relief. If the direct cause of the complaint is known, it should of course be removed. The treatment can be supplemented by rheumatic medicine (NSAID) or injection of corticosteroid in the bursa, preceded by draining of this, which can advantageously be performed under ultrasound guidance.

Rehabilitation: The treatment is dependant upon which bursa is inflamed, but sports activity can usually be cautiously resumed when pain has diminished, especially if the provoking factor has been identified and removed.
Also read rehabilitation, general.

Complications: If progress is not smooth, the correctness of the diagnosis or whether complications have arisen should be considered:

Special: Shock absorbing shoes or inlays will reduce the load.

KONDITION

step4

Training ladder for:
OUTER SNAPPING HIP
(COXA SALTANS, EXTERN)

STEP 4

KONDITION
Unlimited: Cycling. Swimming. Running.

UDSPÆNDING
(15 min)

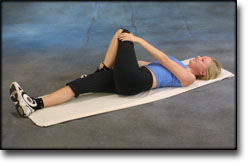
Lie on your back. Draw the injured leg up towards your head so that the muscles in the back of the thigh become increasingly stretched. Perform the exercise with outstretched as well as bent knee. Hold the position for 20 seconds and relax for 20 seconds before repeating. The exercise can also be performed standing with the injured leg outstretched on a chair while the upper body is bent slightly forwards.

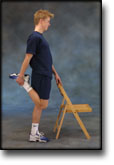
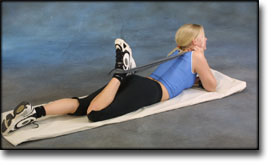
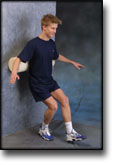
Stand with support from the back of a chair or the wall. Using your hand, bend the knee and draw the foot up and your knee slightly backwards so that the muscles in the front of the thigh become increasingly stretched. Hold the position for 20 seconds and relax for 20 seconds before repeating. The exercise can also be done lying down. If you lie on your stomach you can draw the foot up by using a towel.

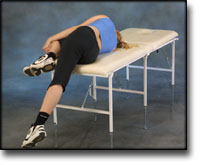
Lie on your side on a table. Bend one leg up under your body and let the other hang over the edge of the table so that the muscles in the outer side of the thigh become increasingly stretched. Hold the position for 20 seconds and relax for 20 seconds before repeating. The exercise can also be done standing by placing the outstretched injured leg behind the good leg at the same time as bending over the injured leg.

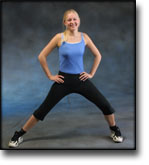
Stand with one leg outstretched and the other slightly bent. Thrust your weight to the side over the bent leg so that the inner side of the opposite thigh becomes increasingly stretched. Hold the position for 20 seconds and relax for 20 seconds before repeating.

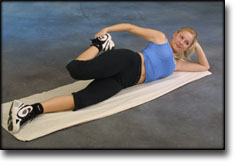
Lie on your back with one leg outstretched and the other bent with the foot on the other side of the outstretched leg. Draw the knee up towards the opposite shoulder so that the buttocks become increasingly stretched. Hold the position for 20 seconds and relax for 20 seconds before repeating.

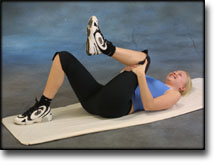
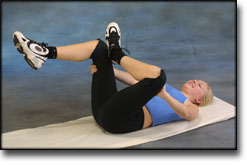
Lie on your back with one leg over the other, and hold behind the lower leg’s knee. Draw the leg up towards your head so that the buttock on the upper leg becomes increasingly stretched. Hold the position for 20 seconds and relax for 20 seconds before repeating.

KOORDINATION
(5 min)

Seesaw. Balance on two legs, possibly using a hand as support against the wall, balancing subsequently on one leg without support. Look straight ahead and keep knees bent.

STYRKE
(40 min)

Stand on the healthy leg with the elastic around the inside of the injured leg. Move the injured leg from side to side in a slow smooth movement. Moving the position of the elastic lower down the leg can increase the load.

Lie on your side on a mattress or bench. Flex the lower part of the leg and stretch the upper part. It is important to completely stretch the hip. Lift the upper leg upwards with the heel pointing towards the ceiling. Gradually increase the load by attaching a sandbag to the ankle.

Lie on your side on a mattress or bench. Stretch the lower leg whilst the upper leg is slightly bent. Lift the lower leg stretched upwards. Gradually increase the load by attaching a sandbag to the ankle.

Stand on the healthy leg with elastic fixed around the hip. The elastic should be fixed to the wall or a wall bar. Take-off on the healthy leg and land on the leg to be trained and keep your balance. Remember that the elastic should be positioned so that it gives resistance at the moment of take-off. Change legs.

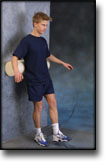
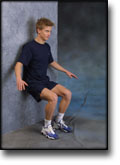
Stand with your back against a wall with a ball or firm round cushion between the wall and your back. Slowly go down to bend your knee 90 degrees before slowly rising up again.

Lie on your back with a ball or firm round cushion under the injured leg. Lift your backside up from the floor and stretch the healthy leg. Hold the position for a few seconds.

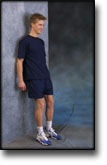
Stand in a doorway or against a wall. Stand with your weight on the healthy leg and press the injured leg against the wall. Hold the pressure for approx. 10 seconds. Rest for 10 seconds. Repeat the exercise for approx. 3 minutes.

Stand with elastic around the hip. Step forward over one knee and hold the front foot firmly against the floor. Bend the rear leg and go forward onto your toes. Remember to change leg.

Stretching is carried out in the following way: stretch the muscle group for 3-5 seconds. Relax for 3-5 seconds. The muscle group should subsequently be stretched for 20 seconds. The muscle is allowed to be tender, but must not hurt. Relax for 20 seconds, after which the procedure can be repeated. The time consumed for stretching, coordination and strength training can be altered depending on the training opportunities available and individual requirements.

KONDITION

step3

Training ladder for:
OUTER SNAPPING HIP
(COXA SALTANS, EXTERN)

STEP 3

KONDITION
Unlimited: Cycling with raised saddle. Swimming. Running with increasing speed and distance.

UDSPÆNDING
(20 min)

Lie on your back. Draw the injured leg up towards your head so that the muscles in the back of the thigh become increasingly stretched. Perform the exercise with outstretched as well as bent knee. Hold the position for 20 seconds and relax for 20 seconds before repeating. The exercise can also be performed standing with the injured leg outstretched on a chair while the upper body is bent slightly forwards.

Stand with support from the back of a chair or the wall. Using your hand, bend the knee and draw the foot up and your knee slightly backwards so that the muscles in the front of the thigh become increasingly stretched. Hold the position for 20 seconds and relax for 20 seconds before repeating. The exercise can also be done lying down. If you lie on your stomach you can draw the foot up by using a towel.

Lie on your side on a table. Bend one leg up under your body and let the other hang over the edge of the table so that the muscles in the outer side of the thigh become increasingly stretched. Hold the position for 20 seconds and relax for 20 seconds before repeating. The exercise can also be done standing by placing the outstretched injured leg behind the good leg at the same time as bending over the injured leg.

Stand with one leg outstretched and the other slightly bent. Thrust your weight to the side over the bent leg so that the inner side of the opposite thigh becomes increasingly stretched. Hold the position for 20 seconds and relax for 20 seconds before repeating.

Lie on your back with one leg outstretched and the other bent with the foot on the other side of the outstretched leg. Draw the knee up towards the opposite shoulder so that the buttocks become increasingly stretched. Hold the position for 20 seconds and relax for 20 seconds before repeating.

Lie on your back with one leg over the other, and hold behind the lower leg’s knee. Draw the leg up towards your head so that the buttock on the upper leg becomes increasingly stretched. Hold the position for 20 seconds and relax for 20 seconds before repeating.

KOORDINATION
(5 min)

Seesaw. Balance on two legs, possibly using a hand as support against the wall, balancing subsequently on one leg without support. Look straight ahead and keep knees bent.

STYRKE
(35 min)

Sit on a chair with elastic around the ankle, facing the elastic. Lift the leg and slowly bend and stretch the knee.

Stand on the healthy leg with the elastic around the inside of the injured leg. Move the injured leg from side to side in a slow smooth movement. Moving the position of the elastic lower down the leg can increase the load.

Stand on the healthy leg with the elastic around the outside of the injured leg. Move the injured leg from side to side in a slow smooth movement. Moving the position of the elastic lower down the leg can increase the load.

Lie on your side on a mattress or bench. Flex the lower part of the leg and stretch the upper part. It is important to completely stretch the hip. Lift the upper leg upwards with the heel pointing towards the ceiling. Gradually increase the load by attaching a sandbag to the ankle.

Go forward on the injured leg until the knee is bent to max. 90 degrees. Stand up on the same leg and return to the starting position.

Stand with your back to the wall with your weight on both feet. Slowly go down and bend the knee to 90 degrees, and slowly rise again.

Lie on your back with a ball or firm round cushion under both feet. Roll the ball backwards and forwards in a steady pace while lifting your backside.

Stand in a doorway or against a wall. Stand with your weight on the healthy leg and press the injured leg against the wall. Hold the pressure for approx. 10 seconds. Rest for 10 seconds. Repeat the exercise for approx. 3 minutes.

Stretching is carried out in the following way: stretch the muscle group for 3-5 seconds. Relax for 3-5 seconds. The muscle group should subsequently be stretched for 20 seconds. The muscle is allowed to be tender, but must not hurt. Relax for 20 seconds, after which the procedure can be repeated. The time consumed for stretching, coordination and strength training can be altered depending on the training opportunities available and individual requirements.

KONDITION

step2

Training ladder for:
OUTER SNAPPING HIP
(COXA SALTANS, EXTERN)

STEP 2

KONDITION
Unlimited: Cycling with raised saddle. Swimming. Light jogging.

UDSPÆNDING
(20 min)

Lie on your back. Draw the injured leg up towards your head so that the muscles in the back of the thigh become increasingly stretched. Perform the exercise with outstretched as well as bent knee. Hold the position for 20 seconds and relax for 20 seconds before repeating. The exercise can also be performed standing with the injured leg outstretched on a chair while the upper body is bent slightly forwards.

Stand with support from the back of a chair or the wall. Using your hand, bend the knee and draw the foot up and your knee slightly backwards so that the muscles in the front of the thigh become increasingly stretched. Hold the position for 20 seconds and relax for 20 seconds before repeating. The exercise can also be done lying down. If you lie on your stomach you can draw the foot up by using a towel.

Lie on your side on a table. Bend one leg up under your body and let the other hang over the edge of the table so that the muscles in the outer side of the thigh become increasingly stretched. Hold the position for 20 seconds and relax for 20 seconds before repeating. The exercise can also be done standing by placing the outstretched injured leg behind the good leg at the same time as bending over the injured leg.

Stand with one leg outstretched and the other slightly bent. Thrust your weight to the side over the bent leg so that the inner side of the opposite thigh becomes increasingly stretched. Hold the position for 20 seconds and relax for 20 seconds before repeating.

Lie on your back with one leg outstretched and the other bent with the foot on the other side of the outstretched leg. Draw the knee up towards the opposite shoulder so that the buttocks become increasingly stretched. Hold the position for 20 seconds and relax for 20 seconds before repeating.

Lie on your back with one leg over the other, and hold behind the lower leg’s knee. Draw the leg up towards your head so that the buttock on the upper leg becomes increasingly stretched. Hold the position for 20 seconds and relax for 20 seconds before repeating.

KOORDINATION
(5 min)

Seesaw. Balance on two legs, possibly using a hand as support against the wall, balancing subsequently on one leg without support. Look straight ahead and keep knees bent.

STYRKE
(35 min)

Sit on a chair with elastic around the ankle, facing the elastic. Lift the leg and slowly bend and stretch the knee.

Sit on a chair with elastic attached to the ankle. Raise the leg and slowly stretch and bend the knee.

Lie on your side on a mattress or bench. Flex the lower part of the leg and stretch the upper part. It is important to completely stretch the hip. Lift the upper leg upwards with the heel pointing towards the ceiling. Gradually increase the load by attaching a sandbag to the ankle.

Stand on the healthy leg with the elastic around the inside of the injured leg. Move the injured leg from side to side in a slow smooth movement. Moving the position of the elastic lower down the leg can increase the load.

Stand on the healthy leg with the elastic around the outside of the injured leg. Move the injured leg from side to side in a slow smooth movement. Moving the position of the elastic lower down the leg can increase the load.

Stand on the injured leg up on a stool with the elastic around your waist. Stand facing the wall. Walk backwards up and down from the stool under resistance from the elastic, alternating between right and left leg first.

Lie on your back with a ball or firm round cushion under both feet. Raise your backside up from the floor and hold your feet on the ball. Hold the position for a few seconds.

Stand in a doorway or against a wall. Stand with your weight on the healthy leg and press the injured leg against the wall. Hold the pressure for approx. 10 seconds. Rest for 10 seconds. Repeat the exercise for approx. 3 minutes.

Stretching is carried out in the following way: stretch the muscle group for 3-5 seconds. Relax for 3-5 seconds. The muscle group should subsequently be stretched for 20 seconds. The muscle is allowed to be tender, but must not hurt. Relax for 20 seconds, after which the procedure can be repeated. The time consumed for stretching, coordination and strength training can be altered depending on the training opportunities available and individual requirements.

KONDITION

step1

Training ladder for:
OUTER SNAPPING HIP
(COXA SALTANS, EXTERN)

STEP 1

The indications of time after stretching, coordination training and strength training show the division of time for the respective type of training when training for a period of one hour. The time indications are therefore not a definition of the daily training needs, as the daily training is determined on an individual basis.

KONDITION
Unlimited: Swimming. Running in deep water.

UDSPÆNDING
(20 min)

Lie on your back. Draw the injured leg up towards your head so that the muscles in the back of the thigh become increasingly stretched. Perform the exercise with outstretched as well as bent knee. Hold the position for 20 seconds and relax for 20 seconds before repeating. The exercise can also be performed standing with the injured leg outstretched on a chair while the upper body is bent slightly forwards.

Stand with support from the back of a chair or the wall. Using your hand, bend the knee and draw the foot up and your knee slightly backwards so that the muscles in the front of the thigh become increasingly stretched. Hold the position for 20 seconds and relax for 20 seconds before repeating. The exercise can also be done lying down. If you lie on your stomach you can draw the foot up by using a towel.

Lie on your side on a table. Bend one leg up under your body and let the other hang over the edge of the table so that the muscles in the outer side of the thigh become increasingly stretched. Hold the position for 20 seconds and relax for 20 seconds before repeating. The exercise can also be done standing by placing the outstretched injured leg behind the good leg at the same time as bending over the injured leg.

Stand with one leg outstretched and the other slightly bent. Thrust your weight to the side over the bent leg so that the inner side of the opposite thigh becomes increasingly stretched. Hold the position for 20 seconds and relax for 20 seconds before repeating.

Lie on your back with one leg outstretched and the other bent with the foot on the other side of the outstretched leg. Draw the knee up towards the opposite shoulder so that the buttocks become increasingly stretched. Hold the position for 20 seconds and relax for 20 seconds before repeating.

Lie on your back with one leg over the other, and hold behind the lower leg’s knee. Draw the leg up towards your head so that the buttock on the upper leg becomes increasingly stretched. Hold the position for 20 seconds and relax for 20 seconds before repeating.

KOORDINATION
(5 min)

Seesaw. Balance on two legs, possibly using a hand as support against the wall, balancing subsequently on one leg without support. Look straight ahead and keep knees bent.

STYRKE
(35 min)

Sit on a chair with elastic around the ankle, facing the elastic. Lift the leg and slowly bend and stretch the knee.

Sit on a chair with elastic attached to the ankle. Raise the leg and slowly stretch and bend the knee.

Lie on your side on a mattress or bench. Flex the lower part of the leg and stretch the upper part. It is important to completely stretch the hip. Lift the upper leg upwards with the heel pointing towards the ceiling. Gradually increase the load by attaching a sandbag to the ankle.

Stand on the healthy leg with the elastic around the inside of the injured leg. Move the injured leg from side to side in a slow smooth movement. Moving the position of the elastic lower down the leg can increase the load.

Stand on the healthy leg with the elastic around the outside of the injured leg. Move the injured leg from side to side in a slow smooth movement. Moving the position of the elastic lower down the leg can increase the load.

Stand in a doorway or against a wall. Stand with your weight on the healthy leg and press the injured leg against the wall. Hold the pressure for approx. 10 seconds. Rest for 10 seconds. Repeat the exercise for approx. 3 minutes.

Stretching is carried out in the following way: stretch the muscle group for 3-5 seconds. Relax for 3-5 seconds. The muscle group should subsequently be stretched for 20 seconds. The muscle is allowed to be tender, but must not hurt. Relax for 20 seconds, after which the procedure can be repeated. The time consumed for stretching, coordination and strength training can be altered depending on the training opportunities available and individual requirements.

examination-article

SportNetDoc

Extraarticular snapping hip: sonographic findings.

Pelsser V, Cardinal E, Hobden R, Aubin B, Lafortune M. AJR Am J Roentgenol 2001 Jan;176(1):67-73.

OBJECTIVE. 
The aim of the study was to determine the sonographic findings of snapping hip and to correlate the findings with the presence or absence of pain.

MATERIALS AND METHODS.
Twenty patients with snapping hip were examined with sonography. Conventional and dynamic sonographic examinations of both hips were performed using a 5.0- or 7.0-MHz transducer.

RESULTS.
Conventional sonographic studies allowed identification of various structural abnormalities (tendinitis, bursitis, synovitis) and helped to document tenderness along the course of specific tendons. Dynamic sonographic studies revealed 26 cases of snapping hip. In 24 of these 26 cases, the underlying cause was clearly identified. Twenty-two snapping hips were caused by an abnormal movement of the iliopsoas tendon, and two were caused by iliotibial band friction over the greater trochanter. One patient reported a bilateral snapping sensation that could not be documented on sonography. Snapping hip was elicited by a wide variety of hip movements. Sonography established an immediate temporal correlation between the jerky tendon motion and the painful snap reported by the patient. Only 14 cases of snapping hip were painful.

CONCLUSION.
Conventional sonographic studies can identify signs of tendinitis, bursitis, or synovitis. Dynamic sonographic studies revealed the cause of snapping hip in most patients. Snapping hip is characterized on sonography by a sudden abnormal displacement of the snapping structure. In our study, a significant proportion of the cases of snapping hip were not painful.

cause-article

SportNetDoc

Coxa Saltans: The Snapping Hip Revisited.

Allen WC, Cope R. J Am Acad Orthop Surg 1995 Oct;3(5):303-308.

Coxa saltans, or “snapping hip,” has several causes. These can be divided into three types: external, internal, and intra-articular. Snapping of the external type occurs when a thickened area of the posterior iliotibial band or the leading anterior edge of the gluteus maximus snaps forward over the greater trochanter with flexion of the hip. The internal type has a similar mechanism except that it is the musculotendinous iliopsoas that snaps over structures deep to it (usually the femoral head and the anterior capsule of the hip). Intra-articular snapping is due to lesions in the joint itself. Diagnosis of the external and internal types is usually made clinically. Radiography can be useful in confirming the diagnosis, particularly when bursography shows the iliopsoas tendon snapping with hip motion. Other radiologic modalities, such as computed tomography, magnetic resonance imaging, and arthrography, may also be helpful, especially when there is an intra-articular cause. Most cases of snapping hip are asymptomatic and can be treated conservatively. However, if the snapping becomes symptomatic, surgery may be necessary. There may also be a role for arthroscopy in the treatment of intra-articular lesions.