Alle indlæg af urtehave_com

Rupture of the ligament between shin and calf bones

RUPTURE OF THE LIGAMENT BETWEEN SHIN AND CALF BONES

Diagnosis: RUPTURE OF THE LIGAMENT BETWEEN SHIN AND CALF BONES
(Syndesmosis rupture)


Anatomy:
The shin bone (tibia) and the calf bone (fibula) are held together by a connective tissue membrane (membrana interossea cruris) which is particularly strong at the ankle joint and forms a false joint. This, together with the membrane, is termed syndesmosis tibiofibularis which is strengthened in front and behind with two strong ligaments (ligamentum tibiofibulare anterius & posterius).

  1. Tibiae
  2. Malleolus medialis
  3. Malleolus lateralis
  4. Lig. tibiofibulare anterius
  5. Membrana interossea cruris
  6. Fibulae

LOWER LEG FROM THE FRONT

Cause: The syndesmosis rupture is most often caused by twisting the foot. The rupture is almost always combined with a fracture in the ankle joint, Injuries of the interior tibiofibular syndesmosis. An isolated syndesmosis rupture is quite rare (article-1), (article-2).

Symptoms: Pain in front of the ankle joint between the shin and calf bones. The pain is aggravated when the foot is turned in relation to the shin.

Acute treatment: Click here.

Examination: As the injury is almost always combined with a fracture of the bones in the ankle, an x-ray examination will always be indicative. The x-ray will show the fracture and a possible increase in the distance between the shin and calf bones.

Treatment: Dressing with a bandage and possible surgical intervention dependant upon the presence of a bone fracture.

Rehabilitation: Rehabilitation is dependent upon the course of treatment (conservative/surgical operation), and of possible fractures and their treatment.
Also read rehabilitation, general.

Complications: If there is not a steady improvement in the condition consideration must be given as to whether the diagnosis is correct, or if complications have arisen:

KONDITION

STEP4

Training ladder for:
TENDON LUXATION – OUTER ANKLE KNUCKLE
(PERONEUS LUXATION)

STEP 4

Avoid the exercises that provoke an uncomfortable slipping sensation on the outer area of the ankle bone. Attempt the exercise at intervals of approximately one week to see if the exercise can be performed without discomfort.
KONDITION
Unlimited: Cycling. Swimming. Running with directional change.

UDSPÆNDING
(10 min)

Stand with the injured leg stretched backwards with the toes facing front. Slowly bend the knee so that the calf muscles become increasingly stretched. Hold the position for 20 seconds and relax for 20 seconds before repeating.

Stand with the injured leg outstretched with the ankle joint bent up against the wall. Press your abdomen against the wall so that the calf muscles become increasingly stretched. Hold the position for 20 seconds and relax for 20 seconds before repeating.

Stand on the good leg while gaining support on the wall with the hand on the same side. Bend the knee of the injured leg and draw the heel towards the buttocks. Take hold of the big toe side of the foot and draw slowly upwards so that the ankle joint is stretched to the maximum and drawn slightly outwards so that increased stretching is experienced on the inside of the shin bone. Hold the position for 20 seconds and relax for 20 seconds before repeating.

Stand on the good leg while gaining support from the wall with the opposite hand. Bend the knee of the injured leg and draw the heel towards the buttocks. Take hold of the little toe side of the foot and draw slowly upwards so that the ankle joint is stretched to the maximum and drawn over the good leg so that increased stretching is experienced on the outer side of the shin bone. Hold the position for 20 seconds and relax for 20 seconds before repeating.

KOORDINATION
(15 min)

Stand on the leg to be trained. Take-off and land on the same leg.

Seesaw. Balance on two legs, possibly using a hand as support against the wall, balancing subsequently on one leg without support. Look straight ahead and keep knees bent.

Stand on the injured leg with your upper body bent forwards at 90 degrees. Lift the good leg in a straight line behind you. When you feel comfortable with the exercise, it can be made more difficult by closing your eyes.

STYRKE
(35 min)

Sit on the floor. Tip the foot up and down with elastic under the forefoot so that the elastic becomes taut.

Sit on the floor. Tip the foot up and down with elastic on top of the forefoot so that the elastic becomes taut.

Sit on the floor. Tip the foot from side to side with elastic on the outer side of the foot, without moving the knee.

Sit on the floor. Tip the foot from side to side with elastic on the inner side of the foot, without moving the knee.

Stand behind a chair. Rise slowly up on tiptoe and go down again.

Up and down from the stool with load. Tie elastic around the hip and go up on the stool in a slow movement. The elastic should be fastened to the wall.

Go up and down from the stool. Go up with alternating right and left legs.

Stand on the healthy leg with elastic fixed around the hip. The elastic should be fixed to the wall or a wall bar. Take-off on the healthy leg and land on the leg to be trained and keep your balance. Remember that the elastic should be positioned so that it gives resistance at the moment of take-off. Change legs.

Stand with both legs on the stool with elastic around the hip. Take-off and land with feet together.

Stand with feet together. Using the ankle joint to take off, hop approx. 5 cm and land on both feet. The exercise should be done on one leg when you are able to do it without discomfort using both legs.

Stretching is carried out in the following way: stretch the muscle group for 3-5 seconds. Relax for 3-5 seconds. The muscle group should subsequently be stretched for 20 seconds. The muscle is allowed to be tender, but must not hurt. Relax for 20 seconds, after which the procedure can be repeated. The time consumed for stretching, coordination and strength training can be altered depending on the training opportunities available and individual requirements.

KONDITION

STEP3

Training ladder for:
TENDON LUXATION – OUTER ANKLE KNUCKLE
(PERONEUS LUXATION)

STEP 3

Avoid the exercises that provoke an uncomfortable slipping sensation on the outer area of the ankle bone. Attempt the exercise at intervals of approximately one week to see if the exercise can be performed without discomfort.
KONDITION
Unlimited: Cycling. Swimming. Running straight ahead (without directional change).

UDSPÆNDING
(10 min)

Stand with the injured leg stretched backwards with the toes facing front. Slowly bend the knee so that the calf muscles become increasingly stretched. Hold the position for 20 seconds and relax for 20 seconds before repeating.

Stand with the injured leg outstretched with the ankle joint bent up against the wall. Press your abdomen against the wall so that the calf muscles become increasingly stretched. Hold the position for 20 seconds and relax for 20 seconds before repeating.

Stand on the good leg while gaining support on the wall with the hand on the same side. Bend the knee of the injured leg and draw the heel towards the buttocks. Take hold of the big toe side of the foot and draw slowly upwards so that the ankle joint is stretched to the maximum and drawn slightly outwards so that increased stretching is experienced on the inside of the shin bone. Hold the position for 20 seconds and relax for 20 seconds before repeating.

Stand on the good leg while gaining support from the wall with the opposite hand. Bend the knee of the injured leg and draw the heel towards the buttocks. Take hold of the little toe side of the foot and draw slowly upwards so that the ankle joint is stretched to the maximum and drawn over the good leg so that increased stretching is experienced on the outer side of the shin bone. Hold the position for 20 seconds and relax for 20 seconds before repeating.

KOORDINATION
(15 min)

Stand on the leg to be trained. Take-off and land on the same leg.

Seesaw. Balance on two legs, possibly using a hand as support against the wall, balancing subsequently on one leg without support. Look straight ahead and keep knees bent.

Stand on the injured leg with your upper body bent forwards at 90 degrees. Lift the good leg in a straight line behind you. When you feel comfortable with the exercise, it can be made more difficult by closing your eyes.

STYRKE
(35 min)

Sit on the floor. Tip the foot up and down with elastic under the forefoot so that the elastic becomes taut.

Sit on the floor. Tip the foot up and down with elastic on top of the forefoot so that the elastic becomes taut.

Sit on the floor. Tip the foot from side to side with elastic on the outer side of the foot, without moving the knee.

Sit on the floor. Tip the foot from side to side with elastic on the inner side of the foot, without moving the knee.

Stand behind a chair. Rise slowly up on tiptoe and go down again.

Up and down from the stool with load. Tie elastic around the hip and go up on the stool in a slow movement. The elastic should be fastened to the wall.

Go up and down from the stool. Go up with alternating right and left legs.

Stand on the healthy leg with elastic fixed around the hip. The elastic should be fixed to the wall or a wall bar. Take-off on the healthy leg and land on the leg to be trained and keep your balance. Remember that the elastic should be positioned so that it gives resistance at the moment of take-off. Change legs.

Stand with both legs on the stool with elastic around the hip. Take-off and land with feet together.

Stretching is carried out in the following way: stretch the muscle group for 3-5 seconds. Relax for 3-5 seconds. The muscle group should subsequently be stretched for 20 seconds. The muscle is allowed to be tender, but must not hurt. Relax for 20 seconds, after which the procedure can be repeated. The time consumed for stretching, coordination and strength training can be altered depending on the training opportunities available and individual requirements.

STEP2

Training ladder for:
TENDON LUXATION – OUTER ANKLE KNUCKLE
(PERONEUS LUXATION)

STEP 2

Avoid the exercises that provoke an uncomfortable slipping sensation on the outer area of the ankle bone. Attempt the exercise at intervals of approximately one week to see if the exercise can be performed without discomfort.
KONDITION
Unlimited: Cycling. Swimming, Light running straight ahead (without directional change) on a smooth surface.

UDSPÆNDING
(10 min)

Stand with the injured leg stretched backwards with the toes facing front. Slowly bend the knee so that the calf muscles become increasingly stretched. Hold the position for 20 seconds and relax for 20 seconds before repeating.

Stand with the injured leg outstretched with the ankle joint bent up against the wall. Press your abdomen against the wall so that the calf muscles become increasingly stretched. Hold the position for 20 seconds and relax for 20 seconds before repeating.

Stand on the good leg while gaining support on the wall with the hand on the same side. Bend the knee of the injured leg and draw the heel towards the buttocks. Take hold of the big toe side of the foot and draw slowly upwards so that the ankle joint is stretched to the maximum and drawn slightly outwards so that increased stretching is experienced on the inside of the shin bone. Hold the position for 20 seconds and relax for 20 seconds before repeating.

Stand on the good leg while gaining support from the wall with the opposite hand. Bend the knee of the injured leg and draw the heel towards the buttocks. Take hold of the little toe side of the foot and draw slowly upwards so that the ankle joint is stretched to the maximum and drawn over the good leg so that increased stretching is experienced on the outer side of the shin bone. Hold the position for 20 seconds and relax for 20 seconds before repeating.

KOORDINATION
(15 min)

Stand on one leg. Play the ball up against the wall.

Stand on one leg on the floor or a mattress. Look straight ahead and keep the knee slightly bent.

Seesaw. Balance on two legs, possibly using a hand as support against the wall, balancing subsequently on one leg without support. Look straight ahead and keep knees bent.

STYRKE
(35 min)

Sit on the floor. Tip the foot up and down with elastic under the forefoot so that the elastic becomes taut.

Sit on the floor. Tip the foot up and down with elastic on top of the forefoot so that the elastic becomes taut.

Sit on the floor. Tip the foot from side to side with elastic on the outer side of the foot, without moving the knee.

Sit on the floor. Tip the foot from side to side with elastic on the inner side of the foot, without moving the knee.

Stand behind a chair. Rise slowly up on tiptoe and go down again.

Up and down from the stool with load. Tie elastic around the hip and go up on the stool in a slow movement. The elastic should be fastened to the wall.

Go up and down from the stool. Go up with alternating right and left legs.

Stand with both legs on the stool with elastic around the hip. Take-off and land with feet together.

Stretching is carried out in the following way: stretch the muscle group for 3-5 seconds. Relax for 3-5 seconds. The muscle group should subsequently be stretched for 20 seconds. The muscle is allowed to be tender, but must not hurt. Relax for 20 seconds, after which the procedure can be repeated. The time consumed for stretching, coordination and strength training can be altered depending on the training opportunities available and individual requirements.

KONDITION

STEP1

Training ladder for:
TENDON LUXATION – OUTER ANKLE KNUCKLE
(PERONEUS LUXATION)

STEP 1

Avoid the exercises that provoke an uncomfortable slipping sensation on the outer area of the ankle bone. Attempt the exercise at intervals of approximately one week to see if the exercise can be performed without discomfort.

The indications of time after stretching, coordination training and strength training show the division of time for the respective type of training when training for a period of one hour. The time indications are therefore not a definition of the daily training needs, as the daily training is determined on an individual basis.

KONDITION
Unlimited: Cycling. Swimming. Running in deep water.

UDSPÆNDING
(10 min)

Stand with the injured leg stretched backwards with the toes facing front. Slowly bend the knee so that the calf muscles become increasingly stretched. Hold the position for 20 seconds and relax for 20 seconds before repeating.

Stand with the injured leg outstretched with the ankle joint bent up against the wall. Press your abdomen against the wall so that the calf muscles become increasingly stretched. Hold the position for 20 seconds and relax for 20 seconds before repeating.

Stand on the good leg while gaining support on the wall with the hand on the same side. Bend the knee of the injured leg and draw the heel towards the buttocks. Take hold of the big toe side of the foot and draw slowly upwards so that the ankle joint is stretched to the maximum and drawn slightly outwards so that increased stretching is experienced on the inside of the shin bone. Hold the position for 20 seconds and relax for 20 seconds before repeating.

Stand on the good leg while gaining support from the wall with the opposite hand. Bend the knee of the injured leg and draw the heel towards the buttocks. Take hold of the little toe side of the foot and draw slowly upwards so that the ankle joint is stretched to the maximum and drawn over the good leg so that increased stretching is experienced on the outer side of the shin bone. Hold the position for 20 seconds and relax for 20 seconds before repeating.

KOORDINATION
(10 min)

Stand on one leg on the floor or a mattress. Look straight ahead and keep the knee slightly bent.

STYRKE
(40 min)

Sit on the floor. Tip the foot up and down with elastic under the forefoot so that the elastic becomes taut.

Sit on the floor. Tip the foot up and down with elastic on top of the forefoot so that the elastic becomes taut.

Sit on the floor. Tip the foot from side to side with elastic on the outer side of the foot, without moving the knee.

Sit on the floor. Tip the foot from side to side with elastic on the inner side of the foot, without moving the knee.

Stand on a soft surface. Rise slowly up on tiptoe and go down again.

Go up and down from the stool. Go up with alternating right and left legs.

Sit with a ball under the foot. Roll the ball backwards and forwards and from side to side.

Stand on both legs. Tip the toes on the leg to be trained upwards and down again, whilst having the heel firmly on the floor during the exercise.

Sit on a chair. Keep the heel firmly on the ground and tip the toes up.

Stretching is carried out in the following way: stretch the muscle group for 3-5 seconds. Relax for 3-5 seconds. The muscle group should subsequently be stretched for 20 seconds. The muscle is allowed to be tender, but must not hurt. Relax for 20 seconds, after which the procedure can be repeated. The time consumed for stretching, coordination and strength training can be altered depending on the training opportunities available and individual requirements.

treatment-article

SportNetDoc

Traumatic subluxation/dislocation of the peroneal tendons.

Brage ME, Hansen ST Jr. Foot Ankle 1992 Sep;13(7):423-31.

Traumatic subluxation/dislocation of the peroneal tendons has been reported following a variety of sports-related activities. The peroneal musculature contracts reflexively during the injury and overcomes the restraining soft tissue. The tendons can then dislocate anteriorly from behind the distal fibula. Some patients have anatomical variations of the posterolateral ankle that predispose them to injury. If the physician is unaware of the injury, the diagnosis may be missed in the acute setting and can develop into a chronic, disabling condition. Treatment of the acute injury is controversial because advocates exist for both conservative and surgical therapies. The chronic, painful lesion should be treated operatively. A tremendous number of surgical procedures have been described for the treatment of chronic tendon dislocations. Choice of a surgical procedure depends upon the anatomy of the peroneal groove and the retinaculum, and the nature of the damage to the area.

Examination-a1

SportNetDoc

Imaging features of avulsion injuries.

Stevens MA, El-Khoury GY, Kathol MH, Brandser EA, Chow S. Radiographics 1999 May-Jun;19(3):655-72.

Avulsion injuries are common among participants in organized sports, especially among adolescent participants. Imaging features of both acute and chronic avulsion injuries of the pelvis, knee, ankle and foot, shoulder, and elbow were evaluated to help distinguish these injuries from more serious disease processes such as neoplasm and infection. At radiography, acute injuries (ie, those resulting from extreme, unbalanced, often eccentric muscular contractions) may be associated with avulsed bone fragments, whereas subacute injuries have an aggressive appearance that may include areas of mixed lysis and sclerosis. Chronic injuries (ie, those resulting from repetitive microtrauma or overuse) or old inactive injuries may be associated with a protuberant mass of bone and may bear a striking resemblance to a neoplastic or infectious process. Although not usually required, computed tomography is helpful in the diagnosis if radiographic findings are equivocal or if the injury is not in the acute phase. MR imaging is best suited for the evaluation of injuries to muscles, tendons, and ligaments. Recognition of characteristic imaging features and familiarity with musculotendinous anatomy will aid in accurate diagnosis of avulsion injuries.

Rupture of the joint capsule at the front of the ankle joint

RUPTURE OF THE JOINT-CAPSULE AT THE FRONT OF THE ANKLE JOINT

Diagnosis: RUPTURE OF THE JOINT-CAPSULE
AT THE FRONT OF THE ANKLE JOINT


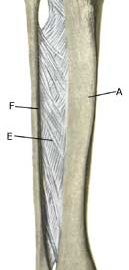
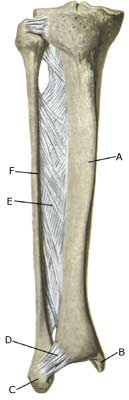
Anatomy:
The ankle joint is stabilised by a joint-capsule as well as a wide fan shaped ligament on the inside (ligamentum deltoideum/mediale), and a set of outer ligaments (ligamentum talofibulare anterius fore, ligamentum calcaneofibulare centre, and ligamentum talofibulare posterius at the rear). There is also a strengthening of the ligaments fore and rear (ligamentum tibiofibulare anterius & posterius). The joint-capsule and ligaments stabilise the ankle joint, especially when twisting and running with sudden directional changes.

Cause: A rupture of the joint-capsule at the front of the ankle joint arises if the foot is over-stretched (plantar flexion), resulting in the joint-capsule over-streching and rupturing. This is often seen when a football player kicks the ground, or strikes the ball on the toe when trying to kick with the instep. In slight cases the injury can be termed a strain or sprain, and in more serious instances as full or partial rupture or tear.

Symptoms: Pain in the ankle joint which is worsened when stretching the ankle joint.

Acute treatment: Click here.

Examination: Medical examination is not necessarily required for very minor cases (slight sprain) with only minimal swelling and no discomfort when walking. The extent of the swelling is, however, not always a mark of the degree of the injury. Medical examination is recommended with more extensive swelling or pain, in order to eliminate bone fracture, bone membrane tear (periosteal avulsion), outer ligament injury in the ankle joint, inner ligament injury in the ankle joint and rupture of the ligament between shin and calf bones (syndesmosis rupture) (article). A normal medical examination is usually sufficient in order to make the diagnosis. X-ray examination will confirm or exclude any suspicion of fracture. Small bone membrane tears (periosteal avulsions) will be best seen using ultrasound scanning.

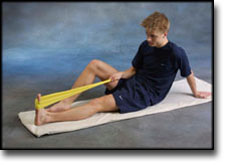
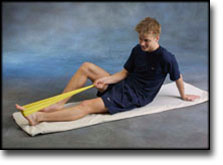
Treatment: Treatment of uncomplicated joint-capsule ruptures will usually be conservative (rehabilitation).

Bandage: It is recommended to use tape in the course of rehabilitation when starting to run on an uneven surface, with sudden directional change, or kicking balls. Taping does, however, not have the same importance as with injuries to the outer or inner ligament in the ankle (tape-instruction).

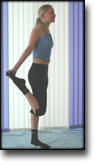
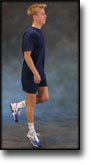
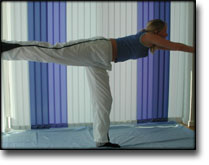
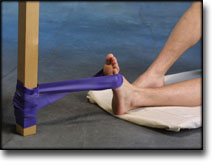
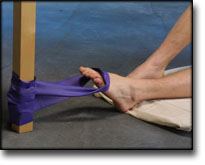
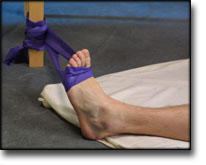
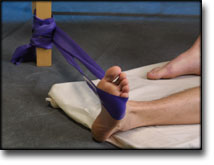
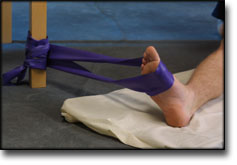
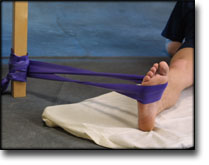
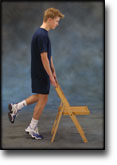
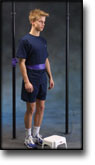
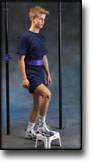
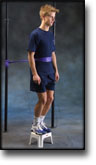
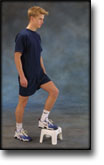
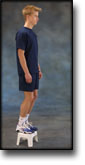
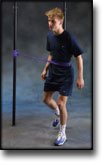
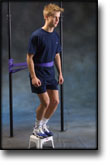
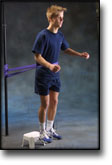
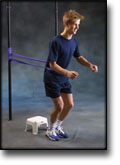
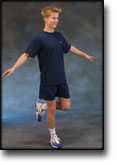
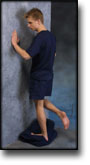
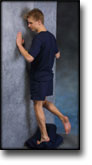
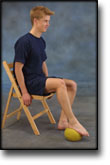
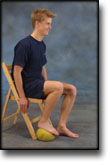
Prevention: Seesaw exercise is important in the rehabilitation phase, as well as in a preventive capacity. As a preventive measure, seesaw exercises should be performed frequently throughout the rest of the active sporting career if ligament injuries in the ankle joint have previously been experienced. Begin by standing with both feet on the seesaw and use hands for support on the wall. Gradually let go of the support to finally train by standing on only one leg (article). Special bandages have in some studies been shown to reduce the risk of ligament injuries (article).

Complications: If there is not a steady improvement in the condition consideration must be given as to whether the diagnosis is correct, or if complications have arisen:

KONDITION

STEP4

Training ladder for:
METATARSUS LIGAMENT RUPTURE
(RUPTURA TRAUMATICA LIGAMENTI PEDIS)

STEP 4

KONDITION
Unlimited: Cycling. Swimming. Running with directional change.

UDSPÆNDING
(10 min)

Stand with the injured leg stretched backwards with the toes facing front. Slowly bend the knee so that the calf muscles become increasingly stretched. Hold the position for 20 seconds and relax for 20 seconds before repeating.

Stand with the injured leg outstretched with the ankle joint bent up against the wall. Press your abdomen against the wall so that the calf muscles become increasingly stretched. Hold the position for 20 seconds and relax for 20 seconds before repeating.

Stand on the good leg while gaining support on the wall with the hand on the same side. Bend the knee of the injured leg and draw the heel towards the buttocks. Take hold of the big toe side of the foot and draw slowly upwards so that the ankle joint is stretched to the maximum and drawn slightly outwards so that increased stretching is experienced on the inside of the shin bone. Hold the position for 20 seconds and relax for 20 seconds before repeating.

Stand on the good leg while gaining support from the wall with the opposite hand. Bend the knee of the injured leg and draw the heel towards the buttocks. Take hold of the little toe side of the foot and draw slowly upwards so that the ankle joint is stretched to the maximum and drawn over the good leg so that increased stretching is experienced on the outer side of the shin bone. Hold the position for 20 seconds and relax for 20 seconds before repeating.

KOORDINATION
(10 min)

Stand on the leg to be trained. Take-off and land on the same leg.

Seesaw. Balance on two legs, possibly using a hand as support against the wall, balancing subsequently on one leg without support. Look straight ahead and keep knees bent.

Stand on the injured leg with your upper body bent forwards at 90 degrees. Lift the good leg in a straight line behind you. When you feel comfortable with the exercise, it can be made more difficult by closing your eyes.

STYRKE
(40 min)

Sit on the floor. Tip the foot up and down with elastic under the forefoot so that the elastic becomes taut.

Sit on the floor. Tip the foot up and down with elastic on top of the forefoot so that the elastic becomes taut.

Sit on the floor. Tip the foot from side to side with elastic on the outer side of the foot, without moving the knee.

Sit on the floor. Tip the foot from side to side with elastic on the inner side of the foot, without moving the knee.

Stand behind a chair. Rise slowly up on tiptoe and go down again.

Up and down from the stool with load. Tie elastic around the hip and go up on the stool in a slow movement. The elastic should be fastened to the wall.

Go up and down from the stool. Go up with alternating right and left legs.

Stand on the healthy leg with elastic fixed around the hip. The elastic should be fixed to the wall or a wall bar. Take-off on the healthy leg and land on the leg to be trained and keep your balance. Remember that the elastic should be positioned so that it gives resistance at the moment of take-off. Change legs.

Stand with both legs on the stool with elastic around the hip. Take-off and land with feet together.

Stand with feet together. Using the ankle joint to take off, hop approx. 5 cm and land on both feet. The exercise should be done on one leg when you are able to do it without discomfort using both legs.

Stretching is carried out in the following way: stretch the muscle group for 3-5 seconds. Relax for 3-5 seconds. The muscle group should subsequently be stretched for 20 seconds. The muscle is allowed to be tender, but must not hurt. Relax for 20 seconds, after which the procedure can be repeated. The time consumed for stretching, coordination and strength training can be altered depending on the training opportunities available and individual requirements.